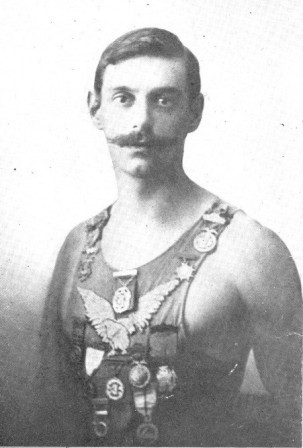
FRANK EUGEN DALTON
The Project Gutenberg EBook of Swimming Scientifically Taught, by
Frank Eugen Dalton and Louis C. Dalton

This eBook is for the use of anyone anywhere at no cost and with
almost no restrictions whatsoever.  You may copy it, give it away or
re-use it under the terms of the Project Gutenberg License included
with this eBook or online at www.gutenberg.org


Title: Swimming Scientifically Taught
       A Practical Manual for Young and Old

Author: Frank Eugen Dalton and Louis C. Dalton

Release Date: August 16, 2006 [EBook #19065]

Language: English

Character set encoding: ISO-8859-1

*** START OF THIS PROJECT GUTENBERG EBOOK SWIMMING SCIENTIFICALLY TAUGHT ***


Produced by Suzanne Lybarger, Brian Janes, Melissa Er-Raqabi
and the Online Distributed Proofreading Team at
http://www.pgdp.net


Copyright, 1912 and 1918, by
FUNK & WAGNALLS COMPANY
(Printed in the United States of America)
Revised Edition, Published May, 1918
Copyright under the Articles of the Copyright Convention of the
[p. 5]
Pan-American Republics and the United States, August 11, 1910
who swam the English Channel from Cape Grisnez near Boulogne, France, to Folkestone, England, August 16-17, 1890; whose enthusiasm and unflagging interest in all matters pertaining to swimming and life-saving have been excelled by none, and who was a faithful practitioner of the methods herein set forth, this book is affectionately dedicated by his son,
That all persons ought to know how to safeguard themselves when in deep water is becoming more and more recognized as time passes. While swimming is probably the oldest pastime known to man, and has had, and still has, its votaries in every country, civilized or uncivilized, it is curious that this most useful science should have been so much neglected.
For an adult person to be unable to swim points to something like criminal negligence; every man, woman and child should learn. A person who can not swim may not only become a danger to himself, but to some one, and perhaps to several, of his fellow beings. Children as early as the age of four may acquire the art; none are too young, none too old. Doctors recommend swimming as the best all-around exercise. It is especially beneficial to nervous people. Swimming reduces corpu[p. 16]lency, improves the figure, expands the lungs, improves the circulation of the blood, builds up general health, increases vitality, gives self-confidence in case of danger, and exercises all the muscles in the body at one time. As an aid to development of the muscular system, it excels other sports. Every muscle is brought into play.
In other important ways it is a useful, and even a necessary accomplishment; no one knows when he may be called upon for a practical test of its merits. The Slocum steamboat catastrophe in the East River, New York, several years ago, gave a melancholy example of what better knowledge of swimming might have done to save the lives of passengers. That awful tragedy, which plunged an entire city into mourning, was too appalling to have its details revived here, but, regardless of the fact that the life-preservers on board were found unfit for use, the loss of life would have been made much smaller had the unfortunate passengers known how to keep their heads above water until help arrived. Millions of people are transported yearly by river craft, and just for lack of knowledge of how to swim a repeti[p. 17]tion of the Slocum disaster might occur any summer.
Only about 20 per cent. of the entire population of the United States know how to swim. A visit to any of the beaches along the Atlantic coast will convince any one of this fact. There is no excuse for this ignorance, especially in a city like New York, with miles of water front and fine beaches at its very door; nor is there excuse in other places where an ocean, lakes and rivers afford opportunities for swimming.
Swimming is a tonic alike for muscle and brain. The smallest child and the weakest woman can enjoy it equally with the strongest man. When slaves of the desk and counting-house are looking forward for an all too brief vacation and seek the mountains or seashore to store up energy for another year's work, they should know how to swim. Poor, indeed, is the region which can not boast of a piece of water in which to take an invigorating plunge.
The importance of being able to swim was very generally recognized in ancient times, notably by the Romans. Roman youth, as early as the Republican era, when trained to bear[p. 18] arms, were made to include in their exercises bathing and swimming in the Tiber, where competitions were frequent. Cassius in his youth became renowned as a swimmer. Shakespeare, in a familiar passage, describes a race between him and Julius Cæsar, Cassius being made the speaker:
Macaulay, in one of his "Lays of Ancient Rome," describes the scene which followed after Horatius had been left alone to face the troops of Lars Porsena, his codefenders having escaped across the bridge:
It was not until the nineteenth century that swimming really became a science. In fact, it was only within the last half-century that a real awakening to its importance occurred. At the present day swimming has come to be regarded as an indispensable adjunct to the education of the young. In many parts of Europe it forms part of the school curriculum. Of such paramount importance is it there held to be that, on entering the army, the first thing taught a young recruit is swimming. On this side of the Atlantic its importance is becoming more evident daily. [p. 20] That the benefits to be derived from it have manifested themselves to municipalities is evidenced by the fact that, in addition to free swimming baths on the water front of New York in summer, there have been established several indoor bathing pavilions which are open and accessible all the year round.
Swimming, aside from its importance as a possible means to self-preservation in case of shipwreck, the upsetting of pleasure-boats, or any of the numerous accidents that so frequently happen on the water, and also, on occasion, as a means of saving life, is not only one of the best physical exercises known, but when one swims for exercise he is also conscious of receiving great pleasure. Most other forms of exercise, after they have been participated in for some time, are apt to become something like efforts, or even hardships. Swimming, on the other hand, continues to be exhilarating.
Unfortunately, those who have been best able to teach the science of swimming, because of having technical knowledge and proficiency, have not made systematic attempts to disseminate knowledge through scientific methods. [p. 21] In this respect the author claims to differ with most other instructors. He has endeavored, in this work, to treat the subject scientifically and to use simple and concise language. His success as a teacher is attested by thousands of pupils who have acquired the principles of a system long known as the Dalton system [p. 22]
The question is often asked whether it is possible for a person to learn to swim by studying a book or a series of articles. Much depends on the person. In the case of a very nervous person, it is improbable that this may be satisfactorily accomplished, for it is then absolutely necessary that a pupil must have an instructor, in order, at the start, to obviate dread of the water.
Where this dread of water or nervousness does not exist in any marked degree, study of a work such as this may be of unlimited advantage. By carefully following its instructions it will be possible to become a very fair swimmer without the aid of an instructor or any second person.
Naturally, it is not claimed that a majority of such self-taught swimmers will ever become experts at the art, altho even this is possible in a great many cases; but there is a moral certainty that, with the exception of the aforementioned nervous beginners, a fair knowledge of the science of swimming may be attained in this manner. Numbers of very good swim[p. 23]mers have had no other tuition than which came from study of a book. Especially is this true when following the directions outlined in this book in the matter, first, of practising keeping the eyes and mouth open under water, which will eliminate all nervousness; and, second, in practising the movements used in the breast and back strokes, which are of inestimable aid when actually taking to the water.
Of course, where the swimmer desires to attain true scientific knowledge of the art, the beginner needs the aid of an instructor who may watch for and correct any faults noticeable, for the simple reason that bad habits once contracted are more difficult to eliminate later on.
If the lessons herein set forth are carefully followed, there is no reason why, with the exceptions before mentioned, one should not become a good swimmer. [p. 24] [p. 25]
It may seem odd to the beginner (and to a great many proficient swimmers, for that matter) that in teaching swimming by the Dalton system, I always begin by having pupils swim first on the back. Most instructors do just the reverse; but during nineteen years of a successful career in teaching, the proficiency of the graduated pupil has justified the method. There are a number of very good reasons why learners should begin by first swimming on the back. More especially is this true of nervous or timid pupils.
In the first place, the body floats more naturally and much easier on the back. In the breast stroke, which is the first one taught by most instructors, the head has to be kept out of the water and must be supported as dead weight by the rest of the body, as explained later on. On the contrary, in the back stroke, or swimming on the back, the head rests on[p. 28] the water and needs no support from any other member of the body.
For the same reason the face, being up and away from the water, the beginner encounters no difficulty in breathing, and there is no danger of the water entering the mouth, which is often the cause of much annoyance to new pupils.
Then, again, while on the back, as the face is turned upward, the beginner, especially in the case of a nervous person, gains confidence from the very fact that he is not constantly looking into the water. And also, in contradistinction to all other strokes in swimming, the arms and legs move together—both arms and legs performing practically the same movements at the same time.
Thus the pupil, realizing the comparative easiness and the absence of any difficulty in, having mastered this stroke, is imbued with such confidence that it becomes simply a matter of time and practise to acquire all other forms of swimming that he may wish to learn.
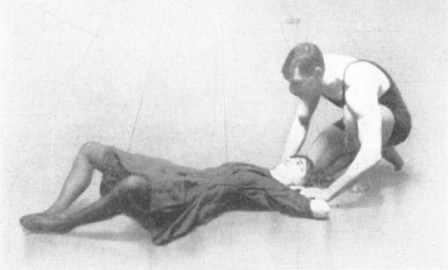
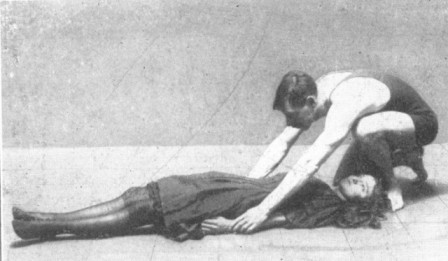
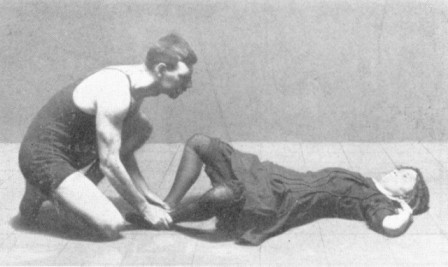
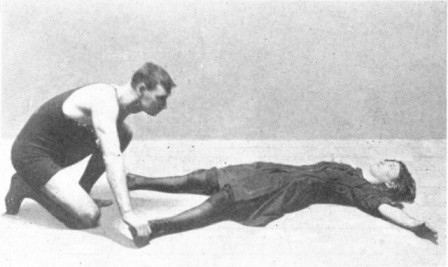
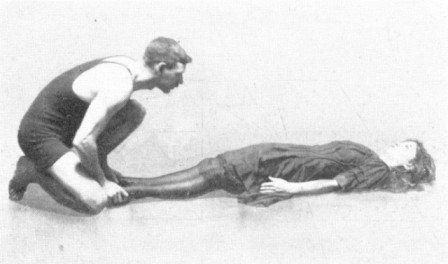
The first thing I do with a beginner, after he or she has donned a bathing suit (a suit in one piece is preferable, as it will not interfere[p. 29] with breathing) is to get the pupil to lie on the back, at full length on the marble, with the heels together, the toes out, the hands at the side of the body. Placing myself back of the pupil's head, the hands are drawn, with the fingers bent, up along the body till they touch the shoulders (Fig. 1), the elbows being well turned out. Then the arms are straightened out horizontally from the shoulder, the palms of the hand down (Fig. 2). Then the arms, being rigid, are brought down sharply to the side of the body (Fig. 3). These movements[p. 30] should be repeated several times until the pupil gets accustomed to them.
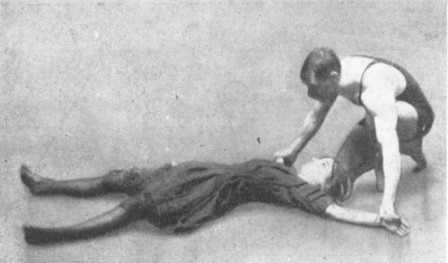
Next the leg movements are shown. The heels are drawn up toward the body as far as possible with the knees well turned out (Fig. 4); the pupil then kicks the legs apart as far as possible, the toes being pointed out straight (Fig. 5). Next the pupil brings the legs sharply together until the heels touch, the toes being turned out (Fig. 6). After these movements have been repeated several times the pupil can try the arm and leg movements together. The arms and legs are drawn up to[p. 31]gether as in Figs. 1 and 4, then the pupil straightens out the arms and legs, as in Figs. 2 and 5, finishing the stroke by bringing the arms and legs sharply together, as in Figs. 3 and 6.
When these movements have been mastered by the pupil, I take him or her into the water, waist deep, putting one hand under the back, the other under the chin, forcing the pupil backward until the ears are under the water, then bringing the pupil's hands to the sides, and slowly starting the movements. After the arm movements are mastered, I take up the[p. 32] leg movements, care being taken that the knees do not come out of the water.
To teach pupils how to regain their feet, I show them how to bend forward from the waist until the face is under water, then the pupil will find his or her feet slowly sinking; when the toes touch the bottom the head can be raised out of the water.
To accustom pupils to the water I teach them to open the eyes and mouth under water. This is much simpler than non-swimmers imagine. Care is taken not to open the eyes too wide. At the first few attempts the pupil[p. 33] will feel amazed, on opening the eyes the first time, at the distance of the vision under water. This is a very good thing to know, and helps beginners to overcome fear of water.
To teach pupils to open the mouth under water I place a rubber ring six inches from the surface and have the pupil bring it to the surface with the teeth. By being careful not to attempt to breathe while under water, the mouth may be opened to any extent without the least danger of swallowing water.
It is wonderful the amount of confidence instilled in a novice on realizing his ability to[p. 34] open the eyes and keep the mouth open under water.
A preserver tied around the waist obviates the necessity of an instructor holding the pupil, and he can, therefore, better direct the movements, so that the pupil, while being held up by a preserver, makes headway, care being taken to do the movements slowly and together. Then the pupil is shown how to turn around. The knees should be drawn up, as in Fig. 4, and then to turn to the left, use the right arm only, the left arm should be held in a straight line with the shoulder; then continue to use the[p. 35] three arm movements with the left arm, until one has turned completely around in the water. To turn the other way, use the other arm.
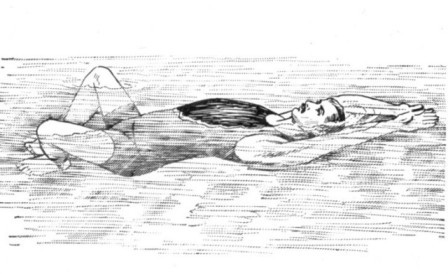
Next the pupil is shown how to float. The knees are drawn up and turned out, the arms extended back beyond the head, as in Fig. 7; the hands, about six inches apart, are kept under water. Deep breaths should be drawn through the mouth and forced into the lungs. The pupil will notice that, at each inflation of the lungs, the body will rise in the water, and sink correspondingly when the air is expelled. This practise shows how buoy[p. 36]ant the body is. The more limp one lies, the more buoyant the body becomes.
Since I started the Dalton Swimming School twelve years ago, at 23 West 44th Street, New York City, I have always shown my method of teaching swimming scientifically, which is exactly the reverse of the methods of other instructors; that is, teaching pupils how to swim on their backs first, before teaching them the breast stroke, which I contend is the hardest stroke of all, when done correctly. Another innovation of mine is the use of the Dalton nose-clip, a clip that pinches the nostrils tightly together, keeping the water out of the nose and forcing the pupil to breathe through the mouth, which is the correct way of breathing while swimming. The more air one gets into the lungs the lighter one is in the water, making swimming easier. That is the reason so many would-be swimmers, simply because they try to breathe through the nose, get winded very quickly. The main thing about breathing in all the strokes is to keep the mouth open all the time. With the mouth open, air can come in and out of its own accord and the pupil does not have to worry about the breathing. [p. 37]
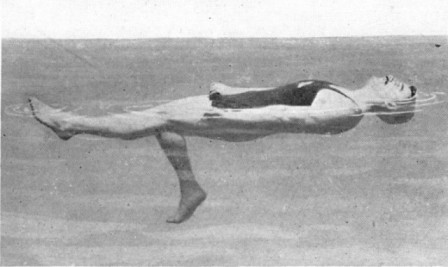
In my next lessons I teach pupils my own stroke—that is, the Dalton stroke. This is employed when on the back, only instead of going head-first through the water, as in the back stroke, the pupil goes feet first. The legs are held out, perfectly straight, then one leg is dropt down in the water, the upper half of leg from knee to thigh remaining stationary (Fig. 8). Then, as that leg is drawn back to its original position, the other leg is brought down in precisely the same manner, the drop[p. 38]ping of both legs alternately in much the same way as when walking. To do this effectively, pressure must be applied to the positive stroke; that is to say, while the foot is being drawn down. The reverse movement, or straightening of the leg, must be made gently. The knees should be brought to the surface of the water each time; this is in a slow but restful movement. The arm movements consist of having arms straight alongside the body, the palms of the hands being turned out, the thumbs down, making small circles with the hands and wrists, as in Fig. 8, propelling one's self ahead with small scoops. It is hard at first to combine the two arm and leg movements, but practise makes perfect; and after the movements are accomplished in unison the pupil will find this a very easy and restful stroke. [p. 39]
In teaching this stroke I revise both the back and the Dalton stroke with the life-preserver on. After the pupil has covered a distance with the back stroke, instead of making a turn to retrace, I show the pupil how to revert to the Dalton stroke, thus avoiding the necessity of turning around. When changing from the back stroke to the Dalton stroke the legs should be brought together and the hands put straight to the sides of the body; then either stroke can be continued. The next move is to let a little air out of the life-preserver. The pupil then begins again on the same strokes. After several trips up and down the pool more air is let out, with more trips up and down the pool, and so on until there is no air left in the preserver.
So slight will be the difference that the pupil will hardly notice it. As long as the back is well hollowed, the upper part of the body will float, but directly the body is doubled up the head and feet begin to sink, so that the teacher must follow close after the pupil to make the pupil keep the back well hollowed and the chest[p. 40] expanded. Beginners will be surprized at the ease with which back strokes propel the body through the water without any undue effort. To one who has never been used to swimming without support it gives a wonderful feeling of exhilaration to propel one's self through the water and then, when tired, to slowly bring the arms back under water until the thumbs come together behind the head and the knees are drawn up to the floating position, while the pupil inhales deep breaths through the mouth, thereby sustaining the body well up in the water. [p. 41]
The breast stroke has been handed down from an early Roman period. It is the oldest of all strokes, but it is the hardest to learn properly, as the head has to be supported clear of the water. Any part of the body when held above water is dead weight, and as the head[p. 42] is all bone, muscle and brains, it is the heaviest part. This is why, in using the breast stroke, it is much harder to keep the mouth and nostrils above water. The breast stroke is so universally identified with swimming that every beginner wants to learn it. It is only on this account that I teach the breast stroke.
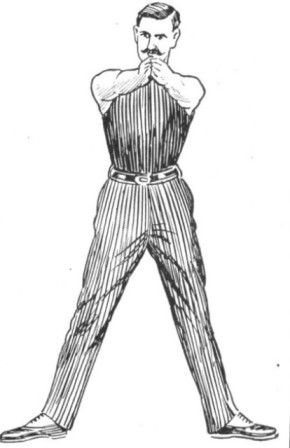
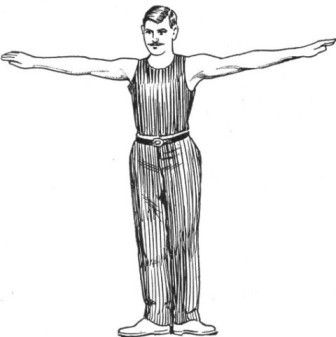
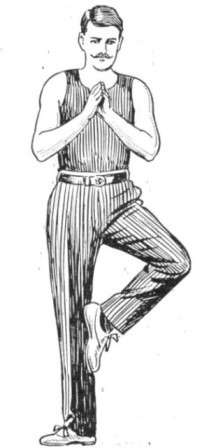
In order to make this stroke clear to beginners I have divided it into four movements each, for the arms and legs. It is a good plan to practise these movements first out of the water. Get the pupil to stand behind, or by the side of, the instructor, and so follow the[p. 44] arm movements. Let him start by having the palms of the hands together, just below the chin, the elbows dropt down and within a few inches of each other, as in Fig. 9. In the first movement shoot the arms straight ahead, holding the hands together, as in Fig. 10. In the next movement turn the hands till the palms are turned slightly out, with the[p. 45] thumbs touching and pointed downward. In the third movement bring the straightened out arms around in line with the shoulders, as in Fig. 11. In the fourth movement bring the hands together till the palms touch, the elbows being dropt, and the wrists touching the chest, as in Fig. 9.
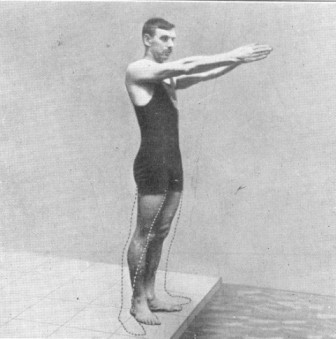
When the pupil has become accustomed to using the arms, the leg movements are taught, each leg separately. The heels are brought together and the toes turned out. Then the left leg is drawn up to the body, the knee turned out, as in Fig. 9. This leg movement is simultaneous with the arm movement, as in Fig. 9. Then the leg is kicked straight out sideways from the body and brought smartly back alongside the other leg, as in Fig. 12. These two movements of the leg are performed while making the one movement of the arm, as in Fig. 10. The arm movements from Fig. 10 to Fig. 11 are accomplished while the legs are stationary, as in Fig. 11. Then the left knee is drawn up, as in Fig. 9, while the hands are brought back to the chest, as in the same figure.
After a little practise with the left leg, the[p. 46] same movements are practised with the other leg and arms. It is hard to practise the arms and both legs together out of water, as in order to do so one has to lie on a piano stool or bench. I discourage this method because the pressure on the abdomen is injurious. After some practise of these movements out of water, we then take the pupil into the water. When the beginner enters the water, it is best for him to be held in a horizontal position by an overhead trolley attached to a belt strapped around the waist, or else held up in the water by the instructor, as per illustration. The four arm movements are tried first, care being taken that the hands do not come out of the water. At the same time they should be kept as near the surface as possible without splashing, care being taken that, on the last movement, the elbows are dropt and the hands kept up in the water. This movement keeps the head up in the water. Should the hands be dropt, the head will sink. The pupil should keep his mouth open all the time, not worrying whether the water enters or not. By this means breathing becomes natural.
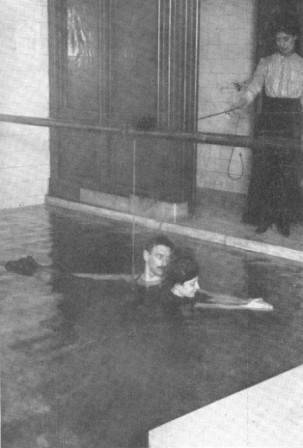
The leg movements are then taken up. The best way is for the pupil, with the left hand, to hold onto the rail that lines the pool and to use the palm of the right hand lower down in the water, against the side of the pool, as in Fig. 13, thereby holding the body and legs up in the water, if the back is arched. The legs should be drawn up, the knees and toes well turned out, and the legs then kicked straight out and brought smartly together. This combined movement forces a wedge of water to be shot behind the legs, forcing the body ahead. The legs are kept stationary for a moment and then drawn up to the starting position.
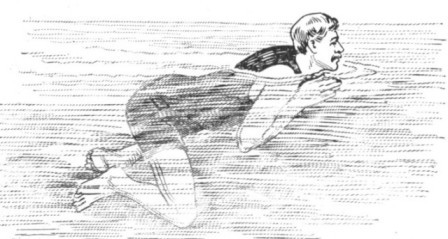

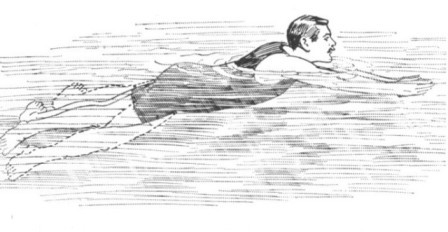
After practising these movements it is a good plan for the pupil to throw himself gently on the water with his face submerged, and so do the leg movements alone, the arms being held straight in front a couple of inches below the surface. As long as the head is under water the legs will not sink. It is surprizing the confidence one gets in doing these leg movements with the face under water. It takes away all fear, especially if the eyes are kept open. When the pupil's breath gives out, he or she should bend backward by hollowing the back, bringing the arms around in line with the shoulders, when the[p. 51] feet will slowly sink and the pupil can easily regain a standing position.
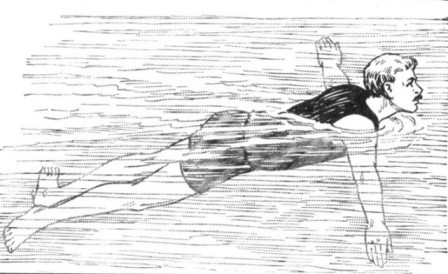
When the arm and leg movements are to be done together, the pupil has to concentrate his mind on the four movements. To start, one must have the legs straight behind, keeping them motionless till the pupil gets to fourth movement of the arm stroke, when the arms and legs should be the same as in Fig. 14. On the first and the second movements, which form a continuous movement for the legs, shoot the arms straight out and hold them there until the straightened out legs come[p. 52] together, as in Fig. 15. Then the legs should be kept rigid, while the hands are turned and the arms brought around in a straight line with the shoulders, as in Fig. 16. Finish the stroke by drawing the legs up and the hands in to the starting position, as in Fig. 14. These combined movements will be difficult at first, as the movements do not go together, as in the back stroke.
When the rhythm begins to assert itself, the best way to practise is with the head under water. Then the pupil can think of his arm and leg movements without the bother and exertion of holding his head above water.[p. 53]
The change from back to breast or vice versa is simple if done slowly. Let us assume the pupil while swimming is using the breast stroke and wishes to turn over. When in position as in Fig. 15, the pupil should roll over on the left side, lifting the right arm out of the water; he will then be in the second back stroke position, ready to continue.
To turn from the back to the breast the movement is a little quicker, to prevent the legs sinking too low. From position on the back as in Fig. 5, roll over on the right side, lifting the left arm out of the water so that the hands meet straight in front. Then quickly snap the legs straight together and bring the arms around in line with the shoulders and resume your regular breast stroke.
These turns should be practised by rolling on either side. The pupil may also bend forward when on the back, as in standing up, and continue with the breast stroke.[p. 54]
By
Louis C. Dalton[p. 56]
The side stroke is used for long distance swimming and is easy to learn on either side. The pupil should count the movements and be deliberate while doing the strokes. Splashing and fast strokes always denote an indifferent swimmer. Easy and graceful swimming can only be acquired by taking slow strokes and keeping the hands under the surface, thereby obviating all tendency of pushing the arms through the air instead of the water. While practising these movements the head must be kept down so as to be supported by the water.
Right Side.—Practise these movements on the floor. Arm Strokes.—The beginner extends the right arm until it straightens in front, keeping it in this position, thus making it easier to acquire balance. Place the left hand at the left side. Movement I.—Draw the left arm slowly up to the chest, palm out. Movement II.—Extend the left arm as far forward as possible.
Movement III.—Draw the left arm down to the side of the upper (left) leg, being careful not to bend the elbow. Leg Strokes. Movement I.—Bend both legs back together from the knees down. Movement II.—Extend the left leg backward from the hip as far as possible,[p. 57] and the right leg forward from the hip as far as possible.
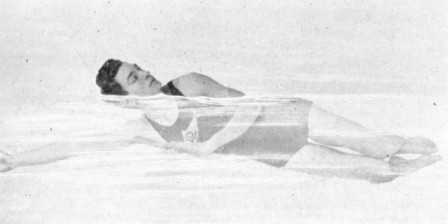
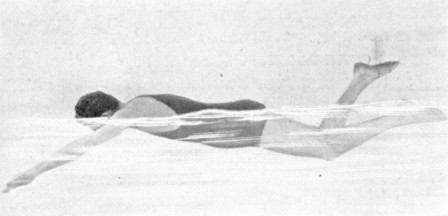
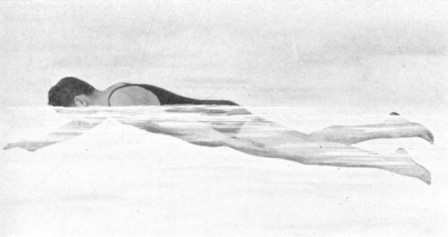
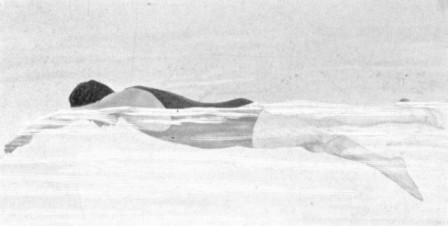
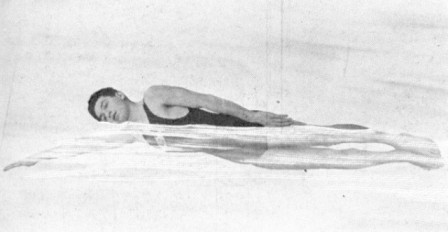
Movement III.—Snap the legs, which should then be perfectly straight, together. Now combine both Movements I. as in Fig. 17, then Movements II. as in Fig. 18, and Movements III. as in Fig. 19. After the pupil is more advanced he may use his right arm by extending it out from and bringing it back to the right side of the body.
Breathing.—Inhale as the left arm is swept alongside the body. Exhale when left arm is extended forward.
Left Side.—The same procedure as for the right side may be followed lying on the left side.[p. 58] This is important to learn as the pupil should swim equally well on either side. It will also help him to acquire good form. Arm Strokes. Movement I.—Draw the right arm forward close to the chest, palm out, elbow at the side. Movement II.—Extend the right arm forward as far as possible, keeping the hand about six inches below the surface. Movement III.—Sweep the right arm sharply down to the right side, then rest. The left arm is not used, but held straight in front to help balance the body. When the pupil is proficient the left arm may be extended out and brought back as on the right side.
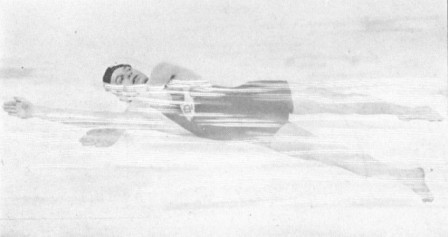
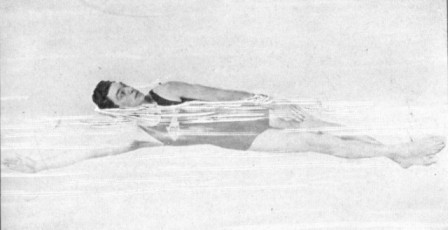
Leg Strokes. Movement I.—Bend both legs back, from the knees down. Movement II.—Spread the legs as wide apart as possible, the right back from the hip and the left forward from the hip. Movement III.—Snap the straightened out legs together. Combine the Arm Movements with the Leg Movements. Movement I.—Draw the right arm close to the chest, palm out; bend both legs back, from the knees down. Movement II.—Extend the right arm forward and spread the legs wide apart. Movement III.—Sweep the right arm down to right side and snap the legs together, then rest while your body is being propelled through the water. Hold the head so the mouth is above the surface, and breathe as on the right side.[p. 60]
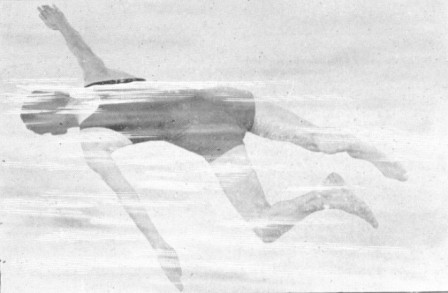
This was one of the racing strokes before the advent of the Crawl, and was considered by some swimmers the fastest stroke. It is quite tiring and should only be used for short distances. A great many swimmers modify this stroke to suit themselves, but there is only one scientific way. The arms are held perfectly stiff, and lifted well above the water on every stroke. First practise with the arms alone. Lie on right side with the right arm extended forward at full length, left arm perfectly rigid at left side. Draw the right arm sharply down[p. 61] through the water to the right side, turning the body at the same time, lifting the left arm out of the water and extending it straight in front.
The legs should be drawn up, heels together, knees spread as the right arm starts to come forward (Fig. 20). Then spread the legs apart as the right arm is extended forward. Snap the legs together as the right arm is swept below the surface to the right thigh. These three leg movements must be done very quickly. The head rests on the water, the mouth just above the surface for breathing.
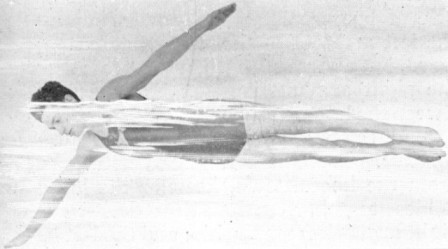
When the left arm is brought forward and later down to the side, the legs remain motionless (Fig. 21). For racing purposes, the arms may be bent at the elbows.[p. 62]
Pupils after mastering the side and trudgeon strokes take to this stroke very quickly, because in reality it is a combination of both.
Right Single Over-Arm Stroke. Arm Strokes. Movement I.—Lie on the right side, right arm drawn in toward the body, hand pointing forward, left arm resting at the left side of body, palm out. Movement II.—Lift the left arm out of the water and extend forward, but at arm's length, away from the head, the right arm motionless. Movement III.—Sweep the left arm sharply down to the side and extend the right arm straight ahead. Leg Strokes. Movement I.—Bend both legs back from the knees down, keeping the knees and ankles together. Movement II.—Place the right leg back from the hip, and the left leg forward from the hip. Be sure the legs are perfectly rigid.
Movement III.—Snap both straightened out legs sharply together, then rest.
Combine with the Arms. Lie on right side. Movement I.—Hold the left arm down to the side, palm out, right arm drawn in toward the body, hand pointed forward, legs bent back from the knees down.[p. 63]
Movement II.—Lift the left arm out of the water, at the same time spreading the legs apart, keeping the right arm motionless (Fig. 22). Movement III.—This movement must be done sharply. Draw the left arm down to the side, extending the right arm straight ahead, while snapping the legs straight together as in Fig. 23.
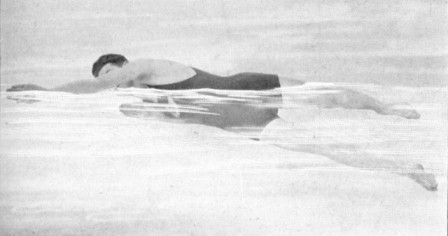
Left Single Over-Arm Stroke. Arm Strokes.—Lie on left side. Movement I.—Place the right arm at right side of body, palm out, the left arm held close to the side. Movement II.—Lift the right arm out of the water, being careful to hold it as far away as possible to avoid splashing, the left arm motionless.
Movement III.—Sweep the right arm sharply down to the right side, and extend the left arm straight ahead. Leg Strokes. Movement I.—Bend the legs back from the knees down, knees and ankles together. Movement II.—Bring the right leg back from the hip, and extend the left forward from the hip. Movement III.—Snap the straightened out legs sharply together.
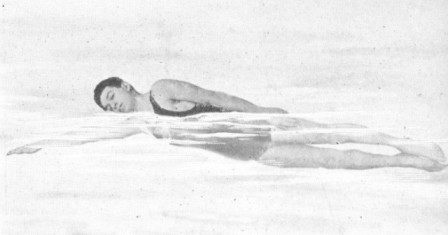
Combine the Arms and Legs. Movement I.—Hold the right arm at full length to right side, palm out; the left hand should be held well in toward the body, pointing forward; bend both legs back from the knees down, knees and ankles together. Movement II.—Lift the right arm out of the water and spread the legs apart;[p. 65] while doing this movement the left arm is motionless. Movement III.—Bring the right arm sharply down to the right side, extending the left arm forward, and snapping the legs quickly together.
Breathing.—Inhale through the mouth, at the moment when each arm is performing the downward stroke on either side, as the mouth will then be clear of the water. Exhale immediately the arm is extended forward.
Anybody who is ambidexterous will find it easier to learn the left single over-arm stroke before the right.[p. 66]
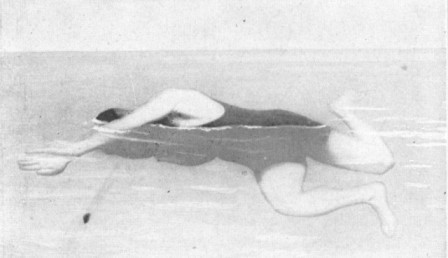
The English Racing Stroke is a great deal more difficult to learn than any of the advanced strokes that we have reached so far, but once the student is proficient, it is one of the prettiest strokes. My brother, Prof. F.E. Dalton, swims this stroke faster than some swimmers do the crawl, and in action he does it most gracefully (Fig. 24). The Arm Movements should first be learned. Lie on the right side (but if the pupil prefers it can be done equally as well on the left). Hold the left arm at the left side. Then raise it out of the water, bending the elbow; the hand should enter palm out, and[p. 67] about six inches below the surface, then extending it as far forward as possible. Next sweep the left arm down to the side sharply. Extend the right arm straight ahead, drawing it in toward the body with a semi-circular scoop.
The leg movements are very difficult and a great deal of practise is necessary before the pupil will be ready to combine with the arms.
The legs are spread apart and snapped together as in the side stroke, but instead of stopping with this scissors kick make an extra small circle kick.
Breathing.—Inhale by turning the head as the left arm is swept down to the left side; exhale under water when the left arm is extended forward. Pay great attention to breathing on each stroke, as this is a great deal more essential than acquiring a little speed, if you wish to swim any distance. Because of improper breathing people who can not swim very well complain more about getting winded quickly, than they do of anything else.[p. 68]
The Double Over-Arm Stroke, while difficult to master, will not prove so for the student who has learned the English racing stroke. Learn the double over-arm to acquire form. For racing the Crawl will answer.
Arm Strokes.—Place the left arm at the left side, then lift it out of the water, bending the elbow and stretching it as far forward as possible; now draw the hand down through the water so it is swept to the side. The right arm should be at the right side in position to come forward perfectly rigid at third movement of left arm. There must be enough roll of the body to allow the right arm to come out of the water to insure proper breathing. Sweep the right arm down through the water as the left arm is raised out of the water.
Hold the face under the water excepting when you inhale after the left arm has passed the mouth; exhale when under as the right arm comes forward.
Leg Strokes.—The legs perform the regular scissors kick at the same time with left arm action, then cross them over and make a smaller scissors kick in conjunction with right arm action while the body is rolling, as in Fig. 25. The arms and legs should be relaxed except when[p. 69] the arms are making their sweep and the legs are snapping together, otherwise the pupil will be under a constant strain which is not conducive to good form in swimming. The pupil may find it very difficult at the start to time this stroke.
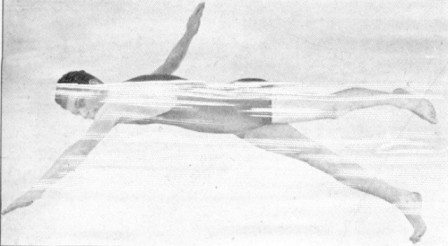
The Crawl and Trudgeon Crawl are by all means the fastest strokes for propelling the human body through the water up to date. The crawl stroke as originally introduced was a combination of the trudgeon arm stroke with a leg drive used by the natives of the South Sea Islands. This stroke has since been so changed by leading swimmers, it is probably entirely different from that originally introduced. A great many amateur and professional coaches advocate the teaching of the crawl to beginners. I would have the pupil note the difference between a Coach and Swimming Instructor. The Coach's pupil knows how to swim, but the Instructor must first teach his pupil. The coaches are so much in favor of the crawl they advocate everybody being taught it when first learning. On the other hand, the Instructor knows that it would take twice as long to teach the crawl to a nervous beginner.
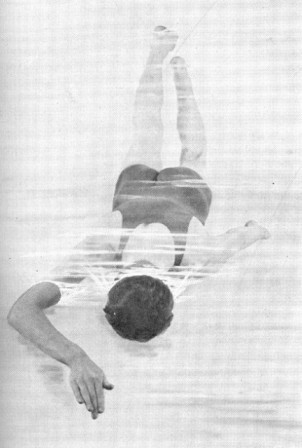
I have had, in consequence, a deluge of requests from novices that they be taught the crawl, so I wish to spread broadcast the fact that it is absolutely essential for pupils to acquire confidence by first learning the simple Back and Dalton strokes. The principal reason for this is the fact that beginners, 85% of whom are nervous, extremely so, will naturally not immerse their faces, and as this stroke must be swum with the face under water it will readily be seen why I differ with the coaches referred to. The crawl, like all other strokes in swimming, must be done slowly to attain speed, and the body relaxed.
Bend all your efforts to acquiring form; speed will come later with constant practise, patience and perseverance. The crawl may be done correctly with varying details, depending on the physique of the swimmer, and ability of the coach to apply the proper methods to his pupil. I have swum the crawl in all its various details, and will explain the method I have found fastest and easiest for the pupil. The crawl, except for short distances, is not the stroke used for racing. The trudgeon crawl is the stroke par excellence for racing purposes.
Leg Strokes.—Extend the arms at full length in front of the head with face under water, while practising with the legs. While doing this hold the breath, but not after you have learned the completed stroke. When practising these movements you must kick the legs a trifle faster than will be necessary when combining with the arm movements.
The legs must be relaxed, especially at the hips, kicking them up and down alternately; in doing this do not open them more than from[p. 73] about ten to fifteen inches as in Fig. 29. This will depend a great deal on the physique and buoyancy of the swimmer. The toes should be pointed behind and the feet turned inward. Be careful that you do not make the mistake of kicking them too high or opening them too much, also that they do not come out of the water. In doing this thrash stroke you will readily know if you are making these mistakes, because the legs will become tired and cramped very quickly. Some fast swimmers bend their legs at the knees as illustrated in Fig. 27, others take a sort of pedalling motion by bending the ankles back and forth.
This is done by bringing the toes up as the leg rises, and pointing them down as the leg[p. 74] snaps back. At the present time the fastest sprinters swim without the great bend in the knee; some bend them slightly to help relax the legs.
The trudgeon crawl kick is a combination of the crawl and the trudgeon, and the reason it is used for sprinting in preference to the crawl is because it is less tiring, thus affording greater speed for long distances. This may be swum in either two, four, six, or eight beats. The eight-beat is not used very often. The six-beat is used by most of the fastest swimmers, but the four-beat is the easiest for pupils to learn and time; it also is very speedy. The legs should be kept close together at all times and after taking two, four, six or eight beats, whichever the case may be, the kick should be formed that the first and fourth kicks amount to narrow scissors kicks, then follow with the regular thrash kick, which is straight up and down, as illustrated in Fig. 28. Point the legs and turn the feet in slightly.
Quite a few swimmers believe their legs are of little assistance, but you will find, if you practise the movements alone the way I suggest, the legs will play a very prominent part in your stroke.
You will be able to make good speed without using the arms. When these movements are thoroughly mastered, after trying all the different variations to discover which suits your[p. 75] particular need, you may then turn your attention to learning the arm stroke.
The Arm Strokes.—The arms should be practised with the face under water, moving the legs only sufficiently to prevent them sinking too low, and also so you can obtain the correct position in the water. The arms should be bent at the elbows after they are brought out of the water. The reach should be straight out from the shoulders, placing the hands as far forward as possible before entering the water; by so doing you will conserve your energy. Hold the hands like a scoop; they should be about six inches below the surface before taking the sweep. While doing this the elbows must be perfectly stiff, sweeping the arms with consid[p. 76]erable force under the surface as far back as the thighs, the body being propelled forward by the powerful force. Swing the arms from the shoulders and just lift them enough so they clear the water. Relax the arms at all times excepting when they take the sweep through the water.
Some swimmers draw the arms under the stomach, others use the arms entirely straight, a few place the arms in close to the head and extend to full length under water. As in the leg stroke, if the pupil tries the different methods he will find which stroke is the easiest to accomplish. Having mastered the arms, combine with the legs before attempting to breathe, as this in itself is quite difficult.[p. 77]
Breathing.—The breathing must be done entirely through the mouth. On the crawl the head and not the body must be turned, and just sufficiently to allow the mouth coming above the water as the left arm passes the head, and a deep breath can then be taken. When the left arm comes forward, turn the face under the water and exhale; repeat on every stroke.
Do not raise your head when breathing or hold your breath for a consecutive number of strokes. Constant practise will loosen the muscles of the neck, when you will find it much easier. In the trudgeon crawl there is a greater roll to the body, and you breathe when rolling toward the right side, as in Fig. 30.[p. 78]
Having learned the arm and leg movements with the breathing, it is now essential that the position of the body be correct (see Fig. 26). Do not make the mistake of burying your head too deep or the legs, either; hollow the back so as to present a slight slant to the water. If the legs and back come too high raise the head a trifle.[p. 79]
Treading water is a very useful and necessary adjunct to swimming, especially so to the person who either falls overboard or goes to the rescue of a drowning person, or when trying to remove one's clothes. In the game of water polo, also, this method of swimming is practised a great deal.
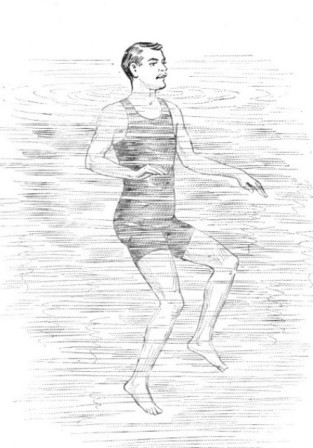
To tread water is like running up-stairs rapidly; the legs have to be brought up and down all the time; the hands should be kept on the surface of the water, the palms continually pressing against the water, and thereby helping the legs to hold the body up.
It is possible to stand perfectly still in deep water, it being merely a question of balance.
Stand perfectly still, with the arms in line with the shoulders and the head kept well back in the water. The head will sink below[p. 82] the surface once or twice until the proper balance is reached. When this is attained try breathing through the mouth. The swimmer can stand still for an indefinite period.[p. 83]
Floating on the surface of the water is enjoyed immensely by all good swimmers. This feat may seem quite simple, but it is not very easily accomplished. There are many persons who are fairly good swimmers, and yet are unable to float properly. The best of swimmers have often attained this feat only after long and persistent practise. It is possible to learn to float without being able to swim, but in that case only by persons not subject to the least nervousness. As a means of securing rest during exercises in the water, floating gives an ideal position. Without the ability to float one lacks the absolute self-confidence in the water so necessary in order to perform numerous aquatic feats.
As a rule, women learn to float more quickly than men, because their bones are lighter. Oftentimes women are able to float the first time they enter the water. Strange as it may seem, while this accomplishment is a very difficult matter for some men to master, with women it is almost natural. Nothing is more enjoyable to a good swimmer than float[p. 85]ing. Especially is this true while bathing at the seashore, when the sea is often rough and the breakers high.
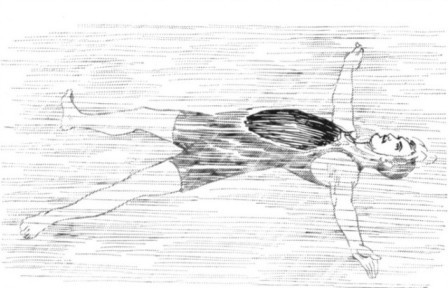
The positions for floating or for swimming on the back is practically the same, the only difference being that in floating the body lies perfectly motionless, while in swimming on the back the limbs are constantly in motion. There is no position more comfortable to a swimmer than floating; it is the position of rest, and no bed is so soft as the ocean. To be able to lie perfectly at ease with only the toes and the lower part of the feet peeping[p. 86] above the water is one of many pretty accomplishments in swimming. Yet it requires considerable practise to become perfect in the art.
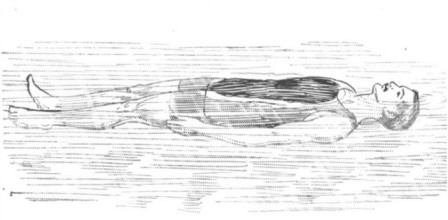
After the novice has mastered the back stroke, it is essential that he should learn how to float in different positions. Begin then by extending the arms above the head, thumbs locked, and back hollowed; then bend slowly backward until the back of the hands and head rest in the water, when, by giving the feet a slight push forward, the legs will rise slowly to the surface. Keep the mouth open and breathe deeply, as the more air injected into the lungs the higher the body will float. The[p. 87] head, being the heaviest part of the body in the water, should therefore be kept well back. Should the legs show a tendency to sink, extend the straightened out arms under the surface in line with the body above the head; this will counterbalance the legs.
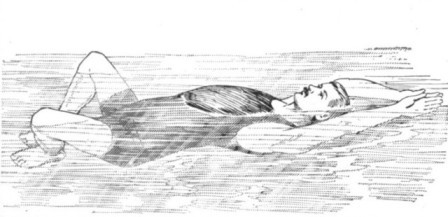
Another method is to draw the heels up close to the body, spreading the knees wide apart so that the heels will touch each other. Should the body roll from side to side, spread the arms until the body is steadied; sometimes a slight stroke from the side which is rolling is sufficient to maintain the balance. As women float much easier than men on account of the smallness of their bones, stout persons are[p. 88] more buoyant in floating than slim ones. Floating in fresh water is more difficult than in salt water. Few male swimmers can float in fresh water at all.
To regain the feet in floating seems to be a difficult thing for beginners, and yet it can be done with comparative ease and little splashing if the arms are brought in front, using the hands as a scoop while pulling the body forward from the waist up. By bringing the body and the head forward until immersed, the legs will be forced to the bottom. One thing beginners should always remember is to keep the lungs well inflated and the head well back in the water; in fact, everything should be kept under water with the exception of the mouth and the nose.
Another important thing to remember in floating is to keep the body limp, and breathe naturally and regularly.[p. 89]
After a person has mastered the first rudiments of swimming, such as the back, breast, and floating strokes, he is naturally anxious to learn to dive. There is nothing more fascinating to a swimmer than a sharp, clean plunge into cool water.
The whole secret of diving is the possession of plenty of pluck and self-confidence. One need not be an expert swimmer to be a good diver. In fact, some persons can dive very well and at the same time are mediocre swimmers. As in other branches, practise makes perfect.
While in ordinary swimming diving is indulged in merely for the pleasure derived therefrom, in racing diving is a very important factor. Frequently races are won mainly from the ability of the contender to dive properly; in other words, to get away with a skimming plunge, thus securing a good start and getting into a stride that carries him to victory.
This form of swimming is also of the utmost importance in the matter of life-saving.[p. 90] As a luxury in sea-water bathing nothing equals a plunge from a good height.
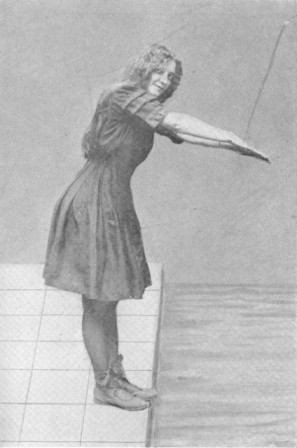
I advise beginners to practise from a float or springboard, the latter being preferable, as the spring naturally throws the legs up into the air, thereby preventing the diver from landing flat on his stomach, as most beginners usually do. The essential points to be considered in diving are to keep the head well tucked in between the extended arms, the thumbs locked, the arms forming an arch above the head. In standing, preparatory to the dive, the knees should be slightly bent, so that the spring comes from the bended knees and toes.
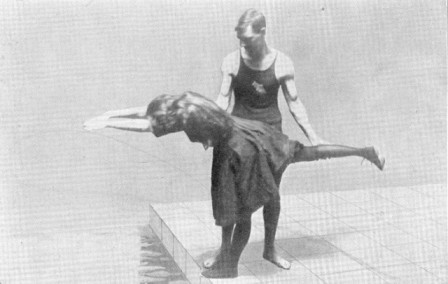
In teaching diving to a nervous pupil, at
first I generally hold up the left leg as he is
bending over to dive. The farther over he
bends, the higher I raise the leg, as per illustration.
Then it is impossible for the swimmer
to fall flat on the water; the upraised
leg prevents that. This is the way that I advise
all would-be divers to make their first
attempt. After a while the diver will throw
up both legs in the air behind him. To obviate
entering the water with the knees doubled[p. 92]
[p. 91]
up, as so many do (see illustration), the toes
must be pointed straight up, back arched.
Pointing the toes tends to straighten the legs
out (see page 94). Another method I
use in teaching a diver to spring well out is to
hold a long stick across the water, about four
feet away and three feet above the diving-board.
This makes the diver spring well out
and throw his legs up behind him. It is well
to impress the diver always to keep his thumbs
interlocked. Otherwise, if he should be diving
in a shallow place, the hands would spread and
the head would strike bottom; locking the
thumbs prevents this.
After deep and shallow dives have been mastered, the pupil can take up various fancy dives, such as the "side dive," "standing-sitting dives," "standing, sitting-standing dive," "back dive," "jack-knife dive," "front-back dive," "back somersault," "front somersault," "sitting jump," and numerous others.
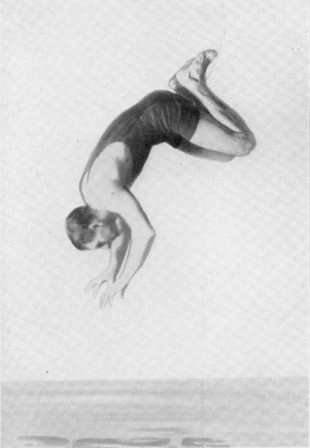
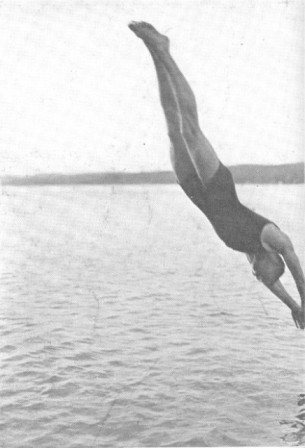
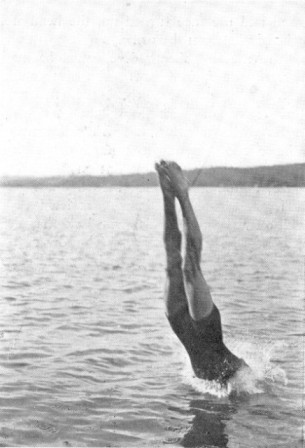
The side dive is made by standing sideways on the diving-board, the forward foot turned so that the toes grip the edge of board. When springing out, the back should be well hollowed and the face turned up, the head well tucked in between the arms.
The "standing-sitting dive" must be made from a good springboard. The diver stands at the edge of the springboard, the arms straight down, with the hands at right angles with the arms, the palms downward. With a slight spring the pupil drops to a sitting position, the palms flat on the springboard, and the legs straightened out rigidly in front. Thus the impact, assisted by a push-off with the hands, will jerk the diver head foremost into space. The diver then turns over, straightening the body and entering the water as in an ordinary dive.
In the "standing-sitting-standing" dive from a standing position the diver assumes a sitting position as in a "sitting" dive, drawing the knees under to regain the feet again and pushing off for the dive.
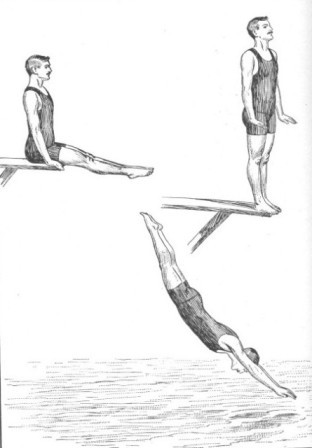
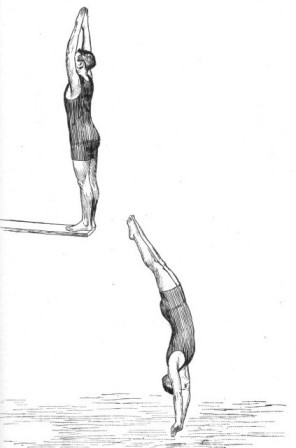
The back dive requires a depth of at least five to six feet. The toes should be well up to the edge of the pool and the back well hollowed. This is the main essential; one also must point the toes out well. This is a very difficult dive and requires plenty of nerve and practise.
The "jack-knife dive" is made from the back-diving position by springing up in the air, doubling the body up from the waist, and throwing the legs up behind, trying to enter the water as clean as possible facing the springboard.
The "dolphin dive" is the straight front dive, only the body must be turned sharply in the air from front to back. The easiest way is to practise this from a springboard about six feet above water.
The back somersault from the springboard requires the swimmer to double up while in the air; the arms should be lowered from the shoulder and bent up from the elbow, and the knees drawn up, so as to make the body ball-shaped, when the turn-over can be made easier.
The front somersault is exactly the same, only with the face forward instead of backward.
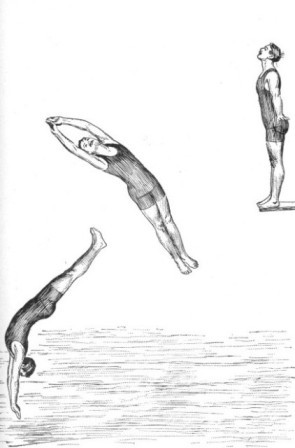
For the Australian splash one stands in the regular diving position, springing well out and doubling the body in the air, with the hands clasping the knees. One must keep the head well forward with the toes pointing down.
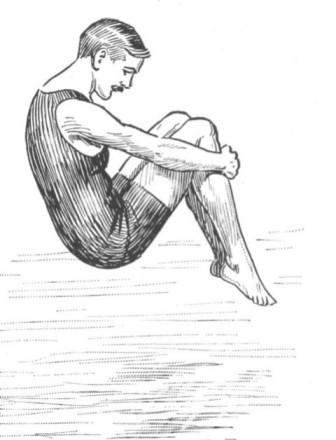
The "neck dive" must be done from a springboard well above the water. Grip the front of the board with the hands, with the head well over the edge, throwing the legs in the[p. 103] air, turning the body over, and back somersaulting into the water, feet first.
When a swimmer has improved and added speed to his racing stroke, he should practise shallow racing dives and how to turn sharply in a tank. This is very important, as many a race has been lost through the inability of the racer to turn sharply when reaching the end of a tank. To practise this, swim slowly to the end of the tank, gage your strokes, so that the right hand grasps the bar which is usually placed around the tank a little above the water. Throw the left arm over the right arm against the marble side of the bath under water; at the same time double the body up, switch around, gathering yourself well together, and shoot forward with the arms extended. Ten to twenty feet can be covered on a good push-off. The method usually followed by swimmers in America is to double up and turn to the left when they are within a foot of the end of the bath without touching with the hands, but pushing off with the feet. In races in England this turn is not allowed, as the racer must touch the end of the bath with his hands.[p. 104]
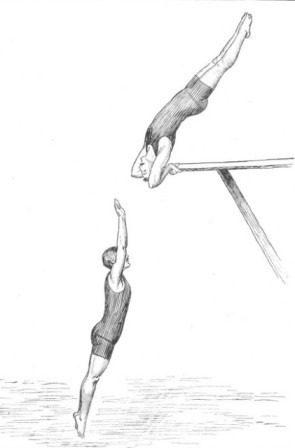
A racing dive is a very shallow dive. The quicker the swimmer gets to the surface the less time is wasted in getting into his stroke. Both these things are very important and should be well practised. When training in a tank, the racer should never go the full distance, but reserve his speed for the day of the race. In a tank it is a good plan to count the number of strokes required to do the length, so that you know just when the end of the bath is reached without turning the head. A straight course is always advisable. This can be kept by swimming parallel with the side of the bath. It is good practise to get a friend to time your lengths, and get used to diving at the word "go." The best position for a racing dive is with the hands in front of the body, the knees bent, and the mouth open, so that you get all the air possible before striking the water. Always spring out as far as you can. Never mind if it is a flat dive. This is much better than a deep, clean dive, and less time is lost.[p. 106]
Children generally manage to swim like a dog in their initial attempts. This is a very easy and simple method of propulsion, mainly for the reason that the arms and legs are never lifted above water.
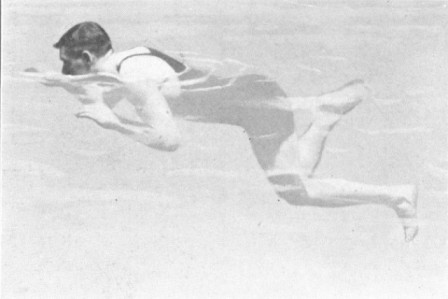
Legs are kicked out straight to the rear, sole of each foot striking the water squarely and alternately, instead of working together. Hands are placed in front of the body, with palms down, and are successively brought down under the body and up again.[p. 107]
To become a good plunger the swimmer, first of all, has to have good lungs. He must be able to hold his breath for at least one minute under water. Ability to float face down, as in the dead man's float, is also essential. Many would-be plungers find that their feet sink after having gone about 25 feet, the reason being lack of practise in floating.
When practising for plunging the take-off should be about three feet above the water. The thumbs should be locked, the knees slightly bent, and the edge of the diving-board gript well with the toes. Empty the lungs by exhaling, then fill again with a long, deep breath, and at the last inhalation spring forward, with all the force possible, taking care not to go deep in the water; about two feet down is sufficient. Keep the head well down and the toes pointing up. The back should be arched and the legs bent up from the knees; this will counteract the tendency of the legs to sink. Unless one makes a straight dive by pushing off equally strong with both legs,[p. 108] the body will go sideways to the side of the pool. Floating on the back and chest is mainly a question of balance, and comes only after considerable practise.
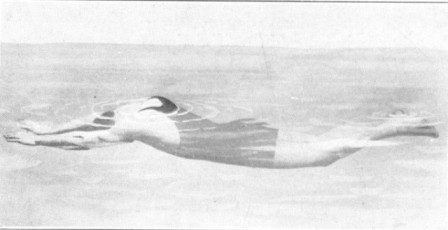
The time limit allowed in a plunge is 60 seconds without raising the face out of the water. The record is over 81 feet, 5 inches, and was made in England by H.W. Allason.[p. 109]
This is one of the simplest methods of swimming on the back, the forearms and hands alone being in motion during the performance. The swimmer turns on the back with the legs straight out and together, or crossed, the arms being flexible and near the body. The hands, with palms downward, must be in line with the thighs, with the fingers slightly raised. The hands are worked from the wrists, from right to left, in addition to a slight movement (right to left) of the forearm. This forces the body, head first, very gracefully through the water.[p. 110]
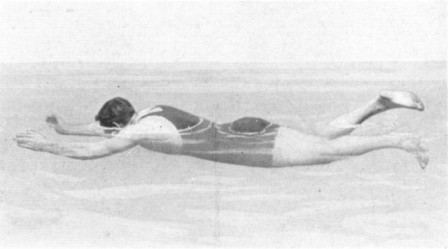
In performing this trick of backward on the chest, the body is placed in position as in the breast stroke, the legs and arms together, outstretched in line with the body. The feet must be moved slowly from the knees, each leg separately. The feet are alternately pushed backward and the toes extended to the rear. The feet must not come above the water. The action of the hands is performed with the palms facing outward, each hand being pushed alternately forward.[p. 111]
Another method of using the hands is the reverse of the breast-stroke movement; in other words, the breast stroke movement is done backward.
Begin with the arms out straight in front, the palms together, and then draw the arms backward until the wrists touch the chest. Next throw out the arms horizontally in line with the shoulders, the palms turned out, thus sending the body backward by bringing the outstretched arms straight together until the palms touch. If the performer be an expert swimmer he can, by using this arm movement, dispense with the leg movements. This is a "stunt" well worth practising, as it looks very effective in the water.[p. 112]
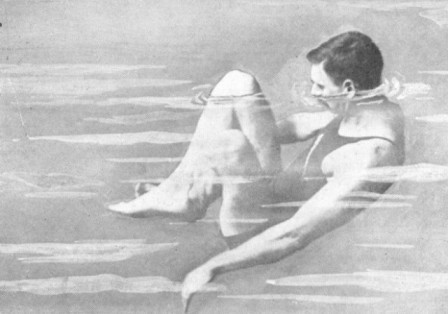
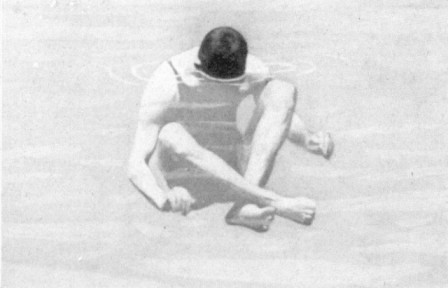
This is a very simple performance and requires little practise. The swimmer turns on his back, doubles the body by bringing the knees up to the chin, with the legs crossed. The body is kept in position by working the hands the same as in sculling. As soon as the swimmer has obtained his balance, he pushes the water away from his body with the right hand and uses the left hand in the opposite manner, or, as it were, pulls the water toward the body with the left hand.[p. 113]
This is a very graceful movement and never fails to excite admiration in onlookers. To do it properly requires considerable practise. One must be able to float well. There is always a tendency to raise the head above the proper level, which in turn causes the feet to sink.
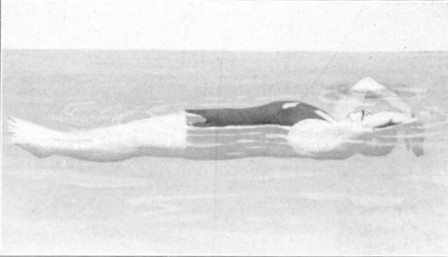
To begin, the swimmer should turn on the back, placing the hands at the side of the body, keeping the head back and the feet together. Slight movements of the hands from the wrists will keep the body floating. Then make a[p. 114] long sweep of the arms from the body, under the surface of the water, until they are at full length beyond the head. Thus the body will be propelled with the feet foremost. As soon as the body is in motion, the hands should be moved by the wrists and forearms only, in a scoop-like manner, with the palms turned outward. The body may be turned round by lessening the movement of one hand and increasing that of the other, the body turning to the side on which the lesser movement is taking place. Bringing the arms to the side again as in the original position will bring the body to a standstill. This trick, seemingly very simple, is somewhat difficult of accomplishment, and requires considerable practise.[p. 115]
This is a rather difficult performance. It requires a great deal of practise. The movements are almost identical with those in the "propeller," the main difference being that in this trick the head is kept under water.
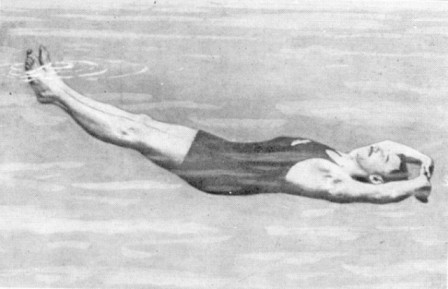
To begin, the performer should lie flat in the water on his back, with his arms stretched out beyond his head. The palms should be turned upward. Then the legs should be raised from the hips, and kept rigid. This[p. 116] will cause the body to become submerged, all but the ankles and feet. One then must work the hands the same as in "propeller," but at the end of each stroke make a slight upward pressure with the palms, so that the body may retain its position below the water.
The movement of the hands will cause the body to move forward, feet first. The swimmer should at all times keep his eyes open in order to guide himself in a straight line.[p. 117]
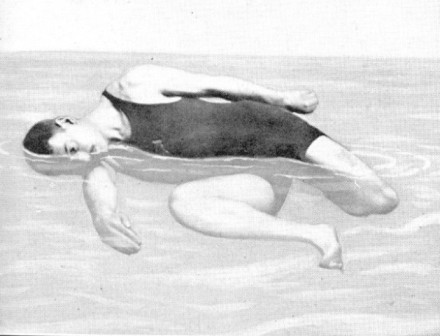
This is a very effective "stunt." After assuming the floating position, turn on the right side, with the arms at full length, the hands close to the body, and the knees drawn up. Begin by moving the legs sideways; that is, bring each knee up alternately, straightening out the legs and making a wide sweep with each leg before bringing it up again. The legs are used the same as paddles on a side-wheeler, as in the illustration. This should be practised on both sides. One hand is made to scoop the water toward the body in front, while the other is manipulated the same way at the back. With a little practise one thus may simulate a Catherine wheel—at least when the act is done rapidly and efficiently. [p. 119]
To roll in the water one has to be able to float well; to roll easily the body must float as high in the water as possible. No movements of arms or legs are required at all, the balancing being done with the head.
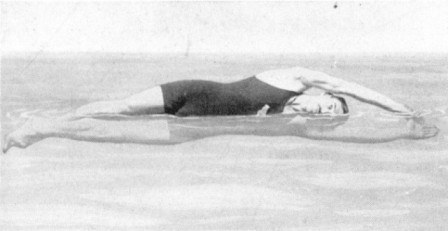
First get into a floating position, the arms extended beyond the head, the ankles crossed as in the illustration. Then fill the lungs well with air, and gently rock the body from side to side, increasing the motion until the body rolls nearly over on its side. Having reached this position, turn the face well over [p. 120] on the right side, and the body will roll over and turn up again on the other side. After the first complete roll, once momentum is started, the second becomes easier. Several rolls can be made before stopping, provided the breath holds out. Always finish in the floating position. When one has learned how to roll over on the right side, rolling on the left side should be practised, until that movement becomes as easy as the other one. After practise the rolls can be made very easily and gracefully, without splashing. The legs must always be kept crossed and together, never letting the hands come out of the water. [p. 121]
This trick, very interesting and pretty, is quite mirth-provoking to the onlooker, especially if indulged in by a number of swimmers. Unlike the vast majority of tricks performed in the water, it does not call for ability to float well, the only qualification being that one must be a fairly good swimmer.
Begin by lying flat on the water with the face downward. Then take a deep inspiration after having cleared the lungs. As the chest begins to inflate, the body must be allowed to sink under water. At the end of the inspiration the head should go below the surface. After a couple of breast strokes under water, turn the head upward. By executing a strong kick with the legs, the head will rise out of the water. As the body rises, make one stroke with the arms, and, as soon as the head comes up, the arms should be recovered to the first position of the breast stroke and pushed together downward through the water from its level to the side of the body. Simultaneously, as the hands are moving toward the body, the legs should be straightened with a sharp kick. This will force the head and shoulders out of the water.
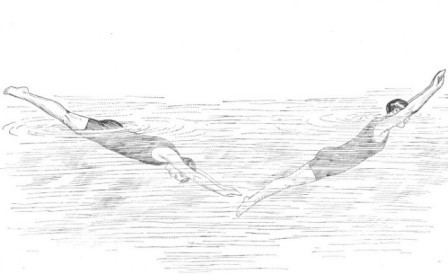
A sudden inclination of the head toward the chest will assist the body in rolling over, when the back and legs will become visible after the head is again under water, the legs being the last to sink. By carefully regulating the breathing, this movement can be effected a number of times. [p. 124]
This is another very clever trick, requiring considerable practise; the main essential is ability to float. The "pendulum" is primarily a balancing feat, a well-inflated chest being the main requisite.
The body should first be allowed to float on the water, with the arms stretched out beyond the head and in line with the body. The head must be thrown well back while the body is kept perfectly still. Then take a deep inhalation, bringing the head well forward, as if to look at the feet. Simultaneously with this movement draw hands toward the head. These combined movements will cause the body to sink, and thus assume a perpendicular position in the water.
When the body has assumed a perpendicular position, the arms must be brought to the front of the body, stretched well out, and at the same time the head must be sunk between the arms until the face and arms lie on the surface of the water. When the arms and head are down, the feet will rise and the body float on the surface with the face down. [p. 125]
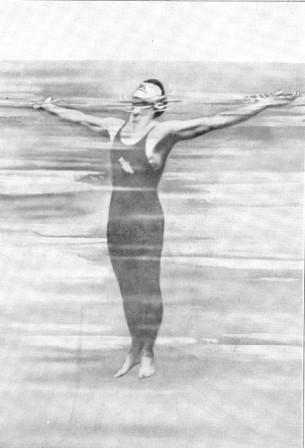
To come back to the first position, the head must be tilted backward and the hands drawn to the back of the head. Again the feet will sink and the body be swung back to a perpendicular position with the face above water. One must then stretch the arms at full length behind the head, with the palms upward, gradually inclining the head backward until the legs once more rise to the surface, and the body floats face upward.
Repetition of these movements produce a swinging similar to that of a pendulum. The movements must be accomplished with regularity, at all times keeping the legs straight and together. [p. 127]
This is one of the easiest and simplest tricks. With very little practise it can be mastered by most ordinary swimmers. Of course, this statement refers to the ordinary somersault, either backward or forward, which is nothing more than a turning over of the body while in the water.
In the back somersault the head is tilted back as far as possible, the legs well drawn up, and the arms thrown out horizontally [p. 128] from the shoulders. Then the body is turned on the back and a stroke taken with the arms and hands. As the body is doubled up, this action causes it to turn completely over, the head going under first.
In the forward somersault, the head is prest down upon the chest, the legs doubled up, the same as in the back somersault, the arms at right angles with the body, and the palms downward. The stroke is made similar to that in the back somersault, but the movement is started in front.
If there are a number of these motions to be made, the lungs should be well filled before beginning, as there is no time for proper breathing. [p. 129]
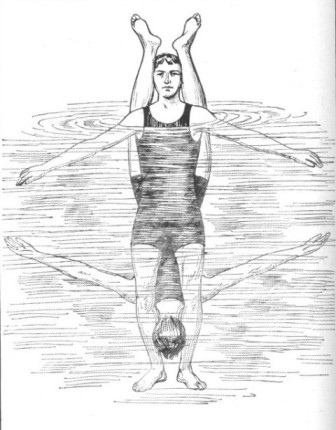
As this trick requires two swimmers, it makes necessary a great deal more practise. To begin, the swimmers stand on the bottom of the pool, one in front of the other. The forward swimmer throws out his arms at a right angle with the body, even with the shoulders, and spreads his legs until his feet are about twelve inches apart. Then the second swimmer, after taking a deep breath, dives under water and places his head between the legs of the other, bending his legs backward until they come close to the head of the forward swimmer, who in turn tilts his head backward so that it may be grasped by the legs of the other.
When in this position, the swimmers begin to turn backward, using the arms the same is in the backward (single) somersault. The head of each swimmer should be tilted well backward. As the head of the forward swimmer disappears below the surface, the head of the other should appear. After several turns the grip of the legs may be released and the swimmers rise to the surface in their original positions. [p. 130]
In this act the swimmer should lie on his back, the same as in sculling, raise one leg until it is at right angles with the body, keeping the other leg straight and rigid. The action of the hands will propel the body forward.
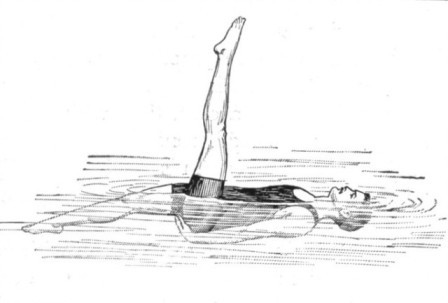
When becoming proficient in this movement, the swimmer can practise raising the other leg. This requires considerable more force in the working of the hands, so that both legs may be kept in position. By performing the motion of the hands directly under the legs, less difficulty will be experienced. [p. 132]
This is an accomplishment that should be learned by all swimmers. In addition to the sense of security given in time of accident, it is productive of great amusement at race meets and exhibitions, and never fails to excite admiration and wonder in the onlooker. Of course, this can be practised with an old or cast-off suit.
Practise first with a coat, then with a coat and waistcoat; next add trousers, and last the shoes and stockings. This will gradually accustom the beginner to the extra weight of the clothes.
In case of an immersion in clothes, with no help in sight, the sooner the swimmer removes his clothes the longer he can support himself. The easiest way is to float on the back and remove the coat, taking out one arm at a time, using the legs as in the Dalton stroke; next remove the vest, still lying on the back; then unbutton the trousers and pull the right leg down with the left hand. To remove the left leg, use the left hand and kick out with the right leg. To remove the shoes, lie on the [p. 133] back and draw up one leg at a time, crossed over the other leg, and so try and undo the laces. If a knife is handy, cut the laces and kick the shoes off. This is one of the most effective feats practised at exhibitions. [p. 134]
This trick is most frequently performed with the wrists and ankles tied with a rope. The performer should plunge into the water as for a shallow dive and rise to the surface without making a stroke. The legs are then drawn up until the heels are quite close to the back of the thighs, then the legs are kicked out together. The arms are drawn down through the water, in front of the body, and then shot out. Care must be taken that too much force be not employed, or much of the beauty of this movement will be lost. Naturally, the pace will be slow, but this does not detract from its neatness, nor lessen the admiration that this trick always calls forth.
This work is often performed by experts, having their arms tied to their sides or behind their backs. When performing in this manner, one must swim on the back, and the legs only can be used for propulsion. In this instance better progress is made, as it is much easier to swim on the back with the hand and feet tied than it is to swim on the [p. 135] breast under the same conditions. One of the main essentials in the performance of this trick is ability to float. These performances, also, are much easier in a tidal river or stream than in still water, as the body is carried forward with the motion of the water, and less exertion is necessary to remain on the surface. [p. 136]
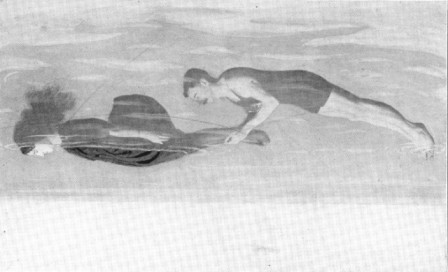
This is one of the prettiest exhibition tricks that can be accomplished in the water. If performed by a lady and gentleman it never fails to elicit great applause. The swimmers begin with floating alongside of each other. Then one slowly paddles ahead of the other with his hands until his toes are in line with the shoulders of the other. When in that position, the first grasps the neck of the other with his toes. Then the other slowly brings his or her arms back under water and catches hold of the ankles of the first. After balancing for a moment, the other dips his or her head below the surface, at the same time giving a strong pull at the ankles of the first, which draws the first directly over him. The first one allowing his arms to float straight behind him. While the first is slowly sailing over the other submerged, the latter watches the former, and when the neck of the first is in line with the feet of the other, the latter raises his feet and grasps the neck of the former, who allows his body to rise to the surface. The performance is then repeated [p. 138] by the first grasping the ankles of the other, and continuing as before.
These movements must be done slowly and gracefully, each swimmer allowing the other time to inflate the lungs before the next pullover is made. After these movements have been gone through about a dozen times, and when in position for the final pull, the forward one should loosen the grip on the neck and propel himself ahead to the side of the other swimmer, when both can bend forward in unison, making a very neat and graceful finale. [p. 139]
To be able to swim under water is quite an accomplishment and often may be of very valuable service, but as an achievement in competition or for exhibition purpose it is not to be encouraged because of the danger of prolonged immersion, and the fact that many competitors do not know when to desist.
Under-water swimming should be practised by experts only, but care must be taken not to prolong the immersion in order to reach a definite point or to accomplish a certain distance before rising to the surface. It often happens that swimmers, in order to achieve a certain distance, remain under water after pains in the back of the neck give warning of oncoming unconsciousness, in which case they may lapse into a state of insensibility, and there is grave danger of drowning.
[p. 140] When these contests take place in baths, it is not a pleasant sight to watch a swimmer struggling on, against odds, in the hope of beating a rival for the coveted prize. The action of the arms and legs become slower and slower, until at last, from sheer exhaus tion, the body rises toward the surface for a short distance and then sinks to the bottom motionless.
One of the advantages of being able to swim under water is the ability it imparts to the swimmer to reach the body of a drowning person, or to bring the body of a drowned person to the surface.
In swimming under water, the ordinary breast stroke is the one used. To swim downward, the head is prest down toward the breast, and when wishing to rise the head is deflected backward.
If swimming under water for a long distance, the body should be kept near the surface, for the reason that the pressure is greater in the corresponding depth. Care should be taken to fill the lungs before starting, and as soon as the first symptoms of asphyxiation are noticeable, the swimmer should rise to the surface.
Among the notable feats accomplished under water may be mentioned that of James Finney, in England, in 1882, who accomplished a distance of 340 feet. William Reilly, of Salford, an amateur, swam 312 feet under water. [p. 141]
The time limit for under-water swimming is about a minute and a half. At the Crystal Palace, London, England, in 1892, in a diver's tank 15 feet deep, Prof. F.E. Dalton picked up 74 plates in a single immersion. [p. 142]
This is one of the most sensational performances of the professional swimmer. From a spectacular point of view it is very effective. To do this trick one must be an adept at under-water swimming; an assistant is necessary in order to tie the knots properly.
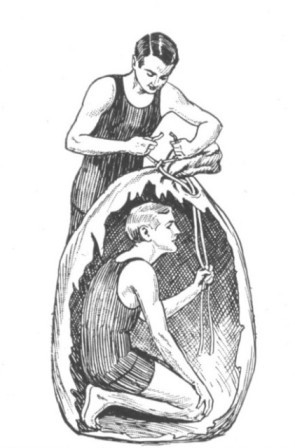
The sack to be used must be large enough to allow plenty of room for the swimmer to move about. At the bottom of the sack place a number of heavy weights. A hole must be cut at the top to allow the rope to be passed through.
The swimmer gets into the sack, taking firm hold of the loosened ends of the doubled rope and that part of the sack close to it. The assistant then takes hold of the ends of the rope and ties them around the sack. The knots must be made on the other side of the sack from that on which the ends have been passed through. After warning the swimmer, so that he may inflate his lungs, he is thrown into the water. The weights at the bottom of the sack will cause him to sink feet first.
After remaining in the sack a few seconds the performer releases the ends of the rope held by him and pushes the sack open with his hands, when he is free to rise to the surface.
This appears to be a very dangerous feat, but in reality is a very simple one for a good swimmer. [p. 144]
Considerable interest was aroused in the early part of August, 1875, when the statement was made that Captain Matthew Webb, an Englishman who had served as second mate on several ships in the Indian and North Atlantic trade, intended to attempt the remarkable feat of swimming across the English Channel. His first attempt resulted in failure. This took place on August 12, 1875. After swimming for 6 hours 48 minutes and 30 seconds, during which period he covered 13½ miles, Webb was compelled to leave the water owing to having drifted 9¾ miles to the eastward of his course by a northeast stream and stress of weather. Webb started from Dover 2 hours 25 minutes before high water on a tide rising 13 feet 7 inches at that port. When he gave up no estimate could be formed as to the probable distance he would have gone west on the tide.
In his second and successful attempt, on August 24 of the same year, Webb started from Dover 3¼ hours before high water on [p. 145] a 15-foot 10-inch tide, which gave him one hour and three-quarters of the southwest stream. His point of landing was 21½ miles from Dover, as the crow flies, but the actual length of the swim was 39½ miles. Very little rest was taken by Webb on the way. When he did stop it was to take refreshment, and then he was treading water. During the whole time he had no recourse to artificial aids. Of this there is indisputable proof. The journalists who acompanied him across in a boat were careful in their observations, and were men whose accuracy could be depended on. The temperature of the water was about 65 degrees. Webb never complained of cold.
For the first 15 hours the weather was fine. The sea was as smooth as glass, the sun obscured during the day by a haze, so that the heat did not affect Webb's head, and in the night a three-quartered moon lighted him on his way. The worst time began at 3 A.M. on August 25th, as drowsiness had to be overcome and rough water was entered. At this hour he was only some 4½ miles off Cape Grisnez, France, and altho he was not then strong enough to strike out a direct course [p. 146] athwart the new northeast stream for land, he was fetching well in for Sangette, where he would undoubtedly have landed between 7 and 8 A.M. had adverse weather not set in. He finally landed on the Calais sands after having been in the water 21 hours 45 minutes. After performing this feat, Webb for some years gave exhibitions of diving and swimming at an aquarium in London and elsewhere. In July, 1883, he came to America for the purpose of swimming the rapids and whirlpool at Niagara, and in this attempt lost his life.
On September 1, 1875, Miss Agnes Beckwith, then only fourteen years of age, swam from London Bridge to Greenwich, a distance of five miles. Beginning her journey at eight minutes to five, Miss Beckwith covered the first mile and a half in 18 minutes. Limehouse Church—a trifle over halfway—was passed in 33 minutes, and Greenwich Pier was reached in 1 hour 7 minutes 45 seconds.
On September 4, 1875, Miss Emily Parker, who had previously undertaken to swim the same distance as Miss Beckwith, not only equalled but excelled the performance of Miss [p. 147] Beckwith. She went on to Blackwall, a distance of seven miles, the time being 1 hour 37 minutes.
On December, 1899, Captain Davis Dalton swam for 12 hours continuously at the Latchmere Public Baths in London, England.
On August 17, 1890, Captain Dalton left Folkestone for Boulogne with the intention of swimming back across the Channel to Folkestone, a distance of 27 miles. Dalton exprest his conviction that he could perform the journey in 20 hours, and if successful would beat the time of Captain Webb. He entered the water at four o'clock on Sunday afternoon, and accomplished the journey, without any remarkable incident, at half-past three the following afternoon.
In July, 1891, Captain Dalton swam from Blackwall to Gravesend in the River Thames, London, covering the entire distance on his back.
In December, 1891, Captain Dalton swam for 16 hours continuously at the Dover Baths, England.
[p. 148]On August 27, 1902, after several brilliant attempts, Montagu Holbein swam the English Channel, but was compelled to desist when only two miles from the finishing point, after staying in the water for 22½ hours.
The following feats have been recorded as accomplished during the year 1911:
William T. Burgess, of Yorkshire, England, crossed the English Channel from South Foreland, Dover, England, to La Chatelet, two miles east of Cape Gris Nez, France. Burgess started at 11.15 A.M., September 5, and finished at 9.50 A.M., September 6. Time, 22 hours 35 minutes. The distance is 40 miles. Burgess is said to have covered nearly 60 miles, owing to changes in the tide and currents.
On June 11th Martin M. Harris, in an attempt to swim from Chester, Pa., to Market Street, Philadelphia, Pa., a distance of 16½ miles, was forced to retire at Greenwich, after covering 13½ miles in 4 hours 8 minutes.
On June 25th Charles Durburrow swam from the Million Dollar Pier, Atlantic City, N.J., to Ocean City, about 8 miles, in the open sea in 5 hours 33 minutes.
On July 22d Jabez Wolffe, in an attempt to cross the English Channel from Sangatte, [p. 149] France, had to retire when within a mile of St. Margaret's Bay, England, owing to adverse tides, after 15 hours' swimming.
On July 23d Charles Durburrow, in an attempt to swim from the Battery, New York City, to Sandy Hook, was forced to give up, owing to adverse tides, when 1¼ miles from Sandy Hook, after swimming about 20 miles in 6 hours 43 minutes. About this time Joseph O'Connor swam from Watertown, Mass., in the Charles River, to Cambridge Bridge, Boston, a distance of about 8 miles, in 6 hours 46 minutes.
On August 6th Samuel Richards swam from Charlestown Bridge, Boston, to Boston Light, a distance of about 10 miles, in 6 hours 15 minutes.
On August 13th Noah Marks swam from Chester, Pa., in the Delaware River, to Walnut Street, Philadelphia, Pa., a distance of 16¾ miles, in 5 hours 19 minutes. Miss Rose Pitonoff swam from East Twenty-sixth Street, New York City, to Steeplechase Park Pier, Coney Island, a distance of about 20 miles, in 8 hours 17 minutes.
On August 20th Miss A. Akroyd swam [p. 150] from Charlestown Bridge, Boston, to Boston Lightship in 7 hours 12 minutes 57 seconds.
On August 27th Miss Elaine Golding swam from the Battery, New York City, to Steeplechase Park Pier, Coney Island, a distance of about 14 miles, in 6 hours 1 minute. Raymond Frederickson finished first in a swim of the U.S. Volunteer Life Saving Corps from the Battery to Coney Island in 6 hours 2 minutes 30 seconds.
On September 3d Miss Adelaide Trapp swam from North Beach to St. George, Staten Island, New York, a distance of about 14 miles, in 5 hours 10 minutes. William D. McAllister won a long-distance swim from L Street bath, Boston, to Spectacle Island and return in 4 hours 50 minutes.
All of these swims were made with aid from tide or current. [p. 151]
Water polo has become one of the most popular and fascinating of all water sports. It can be indulged in by very good swimmers only. It affords abundant opportunity for the exhibition of skill and endurance.
For the following account of water polo the author is indebted to a volume from Spalding's Athletic Library, entitled "Water Polo," written by L. de B. Handley, permission to use it having kindly been granted by the publishers:
The value of an athletic game or contest is determined by four things: Its physical-culture merits; its utility; its attractiveness as a pastime, and its spectacular features.
Water polo has few equals as a means of developing the body. The swimming alone in it would insure general and symmetrical development, but the player wrestles besides, during a game, and every part of the body is [p. 154] given its proportionate share of this gruelling work, developing all muscles in a uniform way.
As to its utility, it is self-evident. Swimming has come to be looked upon as a necessity, simply because it may be the means of saving life, and in this water polo is the most practical of teachers. A player is coached on how to free himself from every kind of a tackle, how to assist an exhausted team-mate and how to apply the best methods of resuscitation when any one is knocked out. Then these teachings have to be practised frequently while the team is at work, and one becomes proficient insensibly and as a matter of course. It is a revelation to see an expert player handle a drowning person, and more especially a frantic one. The rescue is performed in such an easy, matter-of-fact way as to lead one to wonder at the halo of heroism that surrounds most cases of life-saving. Hardly a player but has several rescues to his credit, which he looks upon as a series of trifling services rendered to a fellow mortal, and no more.
[p. 155] As a pastime water polo is among the leaders. Hard and exhausting it may be, but there is an exhilaration in dashing about the pool, fighting one's way to goal, that no other game gives. And it has a feature that appeals strongly to the man who has attained manhood and its numerous responsibilities—the rarity of accidents. Bruises and knockouts one gets a-plenty, but those serious injuries which mar football, hockey and lacrosse are totally unknown. [p. 156]
There is a belief that a game similar to water polo was played by the ancients, but no actual proof of it has been found. Rules were first formulated in England in 1870, and we adopted them in America about 1890, but our present game bears absolutely no resemblance to the one that was then played. In the latter, points were scored by throwing an inflated rubber ball nine inches in diameter through an open goal marked by uprights and a cross-bar; and passing was the feature of the game. Americans found it unsuited. The few available tanks were so small that there was no place for action, and the outdoor season was too short to be satisfactory.
The idea was then conceived of changing the goal into a solid surface, four feet by one in size, and to oblige the scorer to touch the ball to the goal while holding it, instead of passing it.
[p. 157] The innovation met ready favor, but, as may be imagined, transformed the game. From an open passing one water polo became one of close formations and fierce scrimmages. These, at first, were disorderly scuffles, where weight and brute strength reigned supreme, but little by little strict rules were formulated to eliminate rough tactics, and then science became an important factor.
In 1897 a man entered the field who was destined to revolutionize the system of play.
Harold H. Reeder, of the late Knickerbocker Athletic A.C., besides being a good leader and a brilliant individual player, knew how to handle men. He realized that in a growing sport new ideas would mean development, and he made it possible for the members of his squad to experiment with those they had. The system he used is worth a few words of explanation, because it was accountable for the wonderful strides made since 1897, and because every team will profit by its adoption.
Reeder, well aided by Prof. Alex. Meffett, began by teaching every candidate the rudiments of the game; veterans and greenhorns alike were put through the mill. Each was schooled in the principles of swimming, diving, catching, passing, scoring, interfering, tackling and breaking, until these points had [p. 158] been thoroughly mastered, and only then did the team practise begin. But again, no player was allowed in unprepared. Reeder instituted blackboard practise and saw that every one attended it. Placing before his assembled squad the possible formations, he made players selected at random explain the duties of every position in each formation. By this system he obliged every player to use his brains, and he found out the amount of water-polo intelligence that each possest. He also imparted to each the ideas of all the others, he taught them how to fill every position and he brought to light many new plays.
The progress which the innovation was responsible for no one realized until the aggregation of yearlings from the Knickerbocker Athletic Club defeated the formidable array of champions representing the New York Athletic Club. Reeder abandoned the game two years later, but his good work lived after him, and some of his team-mates held the championship for many years by following his teachings.[p. 159]
Water polo as played to-day in America is rather dangerous for outdoors, and indoor pools are generally used. It is a contest between two teams of six, having as object the touching of the opponent's goalboard with an inflated rubber ball seven inches in diameter, which the referee throws into the water at start of play.
In order to score, the ball has to be touched to the goal while in the hand of a player; it can not be thrown. The goals are spaces four by one foot, situated at each short end of the playing area, eighteen inches above the water level. The size of the playing area is optional, tho the recognized dimensions are 60 x 40 feet or 25 x 75 feet, with a uniform depth of seven feet of water. Imaginary lines are drawn across the tank (see Fig. T), parallel to the short ends, at four and fifteen feet from them. The first, called four-foot line, serves as protection to the goal-tenders and can not be crossed until the ball is within; the other is the foul line, and serves to mark the spot on [p. 160] which the forwards line up on being given a free trial. The four-foot line also marks the goal section, a space 4 x 8 feet, in which indiscriminate tackling is allowed when the ball is within.
Each team of six is divided into a forward line (center, right forward and left forward) whose duty it is to attack the opponent's goal; and a backfield of three (half-back, right goal-tender and left goal-tender), upon whom devolves the defense of the home goal.
At the start of play the two teams line up their respective ends, the referee places the ball in the middle of the playing area and then blows a whistle. At this signal the twelve players dive in, the forwards to make a dash for the ball, the backs to take up their positions. The forward who first reaches the ball tosses it back to the defense men, who hold it until the line of attack is formed and then pass it back. Immediately a fierce scrimmage takes place and either a score is made or the ball changes side and a scrimmage occurs at the other end. After the score the teams line up as at start of play.
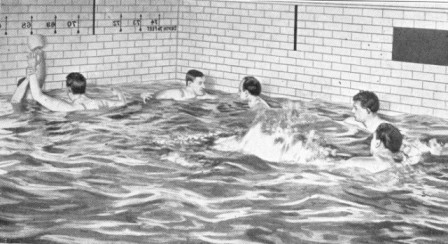
Time of play is sixteen minutes, actual, [p. 162] divided into two halves of eight minutes each, with an intermission of five minutes between halves. Only two substitutes are allowed, and they can only be used to replace an injured or exhausted player. [p. 163]
No man should attempt to play water polo who is not in the best possible physical condition. Before joining the squad, every candidate, be he a novice coming to learn the game, or a veteran resuming training, should prepare himself for the hard work in sight. I don't mean that he should be down to edge, but in good ruddy health. As a matter of fact, a man is far better off if he can start the season with eight or ten pounds of extra avoirdupois; and four or five pounds above "pink of condition" may be carried throughout the season with good results. They will prevent one's getting cold while in the water and keep one from going stale, a very easy matter in water polo.
Preliminary exercise should be taken daily for a week or two in anticipation of starting practise. Long swims are advisable at this early date, but should be abandoned while preparing for a contest, as one sprints only in a game.
The best system to follow is a very simple one. [p. 164]
A few minutes in the steam-room (not more than five) or some calisthenics to warm up the blood, then a fast hundred. This done, rest until you have regained your breath. Taking the water-polo ball next, pass it to given points of the tank to secure accuracy, and sprint after it each time. Then get against the side of the tank, and placing the ball ten or twelve feet away, try to secure it with one hand on a push-off. This, done half a dozen times daily, will insure accurate passing, catching and obviate fumbling.
Another excellent exercise is to place the ball fifteen or twenty feet from you and then swim after it under water, trying to get it without coming to the surface. This has the double object of getting you used to under-water work and accustoms you to looking for the ball while submerged in a scrimmage.
Gymnasium work is not advisable unless one's physical condition is badly in need of building up, and even then only the lightest kind should be taken. It has too great a tendency to harden the muscles; a swimmer's should be soft and pliable.
[p. 165] Breathing exercises can be highly recommended; there is nothing better for the wind. A good system is to take it while walking in the open air. By inhaling for the space of six steps, and exhaling for six, the lungs are properly worked. In cold weather breathe through the nose. [p. 166]
The game of water polo is such a strenuous one that even the best of men often tackle it with misgivings. The new player should on no account attempt to take part in a scrub game until he has thoroughly mastered the rudiments. The man who goes in against an experienced tackler, ignorant of the means of protecting himself, receives punishment so severe as to give him a completely erroneous idea of the game.
If the candidate has followed the suggestions given above he will be physically able to stand the gruelling, but more is needed; he should be able to take care of himself. To teach him how, he must be taken in hand alone, and shown the various tackles and breaks.
This is best done on terra firma; in the water the man will be thinking of the ducking in sight and his mind will not be in receptive mood. It is also essential to make him understand a hold thoroughly before proceeding with another.
Once a man has the movements learned, he [p. 167] can be put in the water with a skilled player and allowed to practise on the latter, who should let him secure the holds without opposition at first, but gradually increase the resistance until he becomes proficient. If there is no one to coach and no good player to practise against, the new men should work on each other.
Water-polo holds are a good deal a matter of individuality; each man builds up a set of his own, but one tackle and one break will serve as a foundation for all.
To learn the tackle, give your coworker the ball and let him come toward you. When he's a couple of feet off, take a good, hard stroke, lift yourself as high out of the water as you can throw your arm around his neck, and pulling his head down until it is jammed hard against your chest, wind your legs around his body. Then you have him at your mercy, and you can proceed to take the ball away from him. This tackle should be learned by forwards and backs alike; all need it.
The best break known is the following: We will suppose that you carry the ball in the right hand. On approaching your opponent [p. 168] throw your left shoulder forward, presenting a three-quarter view. To tackle you effectively he must use his right arm, as you could easily repel a left-handed one in your position. As soon as his right arm goes up, place your left hand squarely under his armpit and let yourself sink, twisting around, face toward him, as you pass under, and as soon as you are on your back force his body over you. Then plant both feet on him and shove off. In most cases, if you succeed, you will find yourself between your opponent and his goal, where all you have to do is to touch the board for a score.
To use the legs at every possible chance should be a principle of the player. Once an opponent is caught in a good leg-hold he is rendered helpless. Incidentally, the wise player ceases struggling when he recognizes that he is caught beyond freeing. It is an excellent rule also to avoid being tackled uselessly; if a body encounter is liable to let you out best, or will help your side, go into it heart and soul, just as hard as you know how, but never make a senseless sacrifice.
[p. 169] Passing and catching are all important factors in water polo and should be practised constantly. In passing it is well to bear in mind that the object in view is to give the ball securely to one's team-mate. Pass high and carefully; a low throw may be intercepted and a hard one fumbled. Specially in close quarters high passing is essential.
To cover one's opponent when the other side has the ball and get away from him when one's own has it, should be the religion of every player. In covering him, always stay back of him, where you can watch him, and tackle him just in the nick of time if the ball is passed to him.
Many new men have an idea that one knows intuitively how to score, but it is not so. The various ways must be learned. One only does in a game what one has become used to in practise, for there is little time or chance to think in the excitement of a keen contest, and it is those things which have been ground into one by dint of repetition that stand by one. To get used to scoring, place yourself three or four yards from goal and then sink yourself, or let some one else put you under, and try to come up and hit the [p. 170] board with eyes closed; you will soon find what a difference practise makes. You must also learn how to hurdle by letting some one tread water between you and goal and score by placing your free hand on his shoulder and lifting yourself over.
A short course of the above, and you will be ready to line up. [p. 171]
On entering the tank for an important game, every player should forget his individuality and submit passively to the orders of the captain. There must be only one head for a team to succeed, and an order should be executed without hesitation and without questioning; right or wrong, the best results come through blind obedience. The man giving the orders often sees an opening that the other does not.
Let no personal difference affect your game; play to win, not to pay off an old score. It is the goals made, not the men disabled, that give one victory, and victory is what every player should seek.
To the forward, discrimination is a valuable asset. When caught in a tackle so far away from goal that getting free will not help you pass the ball at once, don't allow your opponent to punish you. But if you are nailed within easy reach of goal, fight as long as there is breath of life in you. Never mind how helpless the task may seem, a team-mate [p. 172] may come to the rescue at any moment, and then you'll score.
The forward should always play the ball in preference to the man and keep free as much as possible. And above all—play fast and hard.[p. 173]
1. The ball shall be the regulation white rubber association football not less than 7 nor more than 8 inches in diameter.
2. The goals shall be spaces 4 feet long and 12 inches wide marked "Goal" in large letters. One shall be placed at either end of the tank, 18 inches above the water-line equally distant from either side.
3. To score a goal the goal must be touched by the ball in the hand of an opposing player and the greatest number of goals shall count game.
4. The ball shall be kept on or as near the surface of the water as possible, and shall never intentionally be carried under water. No goal shall be allowed when scored by an under-water pass.
5. The contesting teams shall consist of six a side, with two reserve men who can be substituted at any time when the ball is not in play. A player withdrawn can not return to play. Only six prizes shall be given to the winning team.[p. 174]
6. Time of play shall be 16 minutes actual time, divided in two halves of 8 minutes each and 5 minutes rest between halves. Time occupied by disputes, free trials for goal, repairing suits, and lining up after a goal has been scored shall not be reckoned as time of play.
7. The captains shall be playing members of teams they represent and shall toss for choice of ends of tank. The ends shall be changed at half time.
8. The referee shall throw the ball in the center of the tank and the start for the ball be made only at the sound of the whistle.
9. A ball going out of the tank shall be returned to the place from which it was thrown and given to the opposing team.
10. A mark shall be made four feet from each goal on the side of the tank and an imaginary line between these marks shall be called the four-foot line. No man will be allowed within this line until the ball is within it. The goal-tenders, limited to two, of the defending side are alone exempt from this rule. When the ball is within the goal-line the goal-tenders shall not be allowed any artificial support other than the bottom of the tank. [p. 175]
11. No player is allowed to interfere with an opponent unless such an opponent is within four feet of the ball, except when the ball is within the goal section, when indiscriminate tackling will be allowed in the goal section, the goal section to be a space of four feet by eight feet within the goal-line and between two parallel lines drawn at right angles to the goal-line and distant two feet from either end of the goal.
12. Upon a goal being gained, the opposite teams shall go to their own end of the tank, and the ball shall be thrown by the referee into the center and play started as at beginning of game.
13. Each team shall have two judges, one at each goal-line, who, upon a goal being made, shall notify the referee and announce the same.
Only in case the judges disagree shall the referee have power to decide whether a goal be fairly made or not.
14. The referee shall decide all fouls, and if in his opinion a player commits a foul he shall caution the team for the first offense and [p. 176] give the opponents a free trial for goal at each succeeding foul.
A free trial for goal will be given by lining up three backs of the defending team within the 4-foot line and giving three forwards of the opposing team the ball on the 15-foot line, when they may try for a goal until a goal is scored or the ball goes outside the 15-foot line. Only three men from each side will be allowed within the 15-foot line, until the ball goes outside that line or a goal is scored.
Fouls.—It shall be foul to tackle an opponent if the ball is not within four feet of him or to hold him by any part of his costume. It shall be a foul to cross the 4-foot line ahead of the ball, unless forced over by an opponent, or to hang on to the sides of the tank except for the purpose of resting.
Unnecessary rough work may, within the discrimination of the referee, either be counted a foul or the referee may put the offender out of the tank until a goal is scored or the half ends.[p. 177]
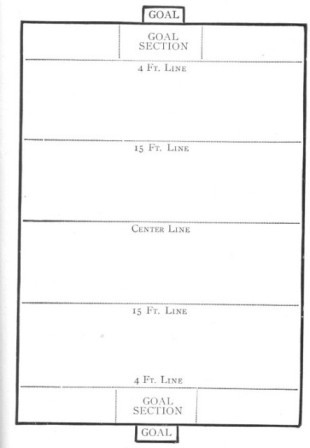
To be suddenly seized with cramps is a thing liable to happen to most expert swimmers; it is caused by various reasons—staying too long in the water and getting chilled, going in after a heavy meal, stiffening the legs too much, and varicose veins. Preventive: Never remain in the water after feeling chilled; always swim around and exercise yourself; twenty minutes is long enough for any one to remain in the water; always turn over on the back when getting a cramp, and float, at the same time working toward the shore with the hands, and don't lose your presence of mind.
Don't attempt to rescue a person from drowning unless you are a good swimmer yourself; remember that a drowning person is generally insane for the time, and is liable to drag you to your death unless you are capable of swimming with a heavy load. [p. 182]
To the person who accidentally falls overboard, or who is compelled to leap into deep water, as was the case with many victims of the General Slocum, the first essential is to keep one's presence of mind. Do not feel alarmed if your head should sink below the surface once or twice—you are bound to come to the surface, and will be able to sustain yourself for a considerable time, even if you are not a swimmer, if you will but keep your hands under water. The reason so many people drown is because directly they come to the surface they raise their hands above their head and shout for help. This is fatal. The moment the hands are raised out of the water the body will sink below the surface.
Another thing to remember is to keep the mouth closed until the body attains the floating position; then try and breathe naturally through the mouth and help propel yourself with your hands. Should you be able to swim, try and take off your outer clothing, as the latter, when water-soaked, tends to drag the body down, besides retarding the movements of the drowning person. [p. 183]
To risk one's life in order to save a fellow being from drowning is one of the most heroic acts that one may be called upon to perform, yet how many of us have the presence of mind and courage to act in such an emergency? To rescue a person from drowning is no child's play, even for the best swimmers; it requires pluck, nerve and stamina. Of course, I allude to rescues which take place some distance from shore. Many a daring swimmer has been clutched and dragged down to death simply because he did not know the safest way to approach a drowning person.
Of the many different ways of saving life, the safest and best method is to swim as near the person as possible, then dive under and come up behind him; otherwise he is liable to grab you around the neck with a death clutch, from which it is extremely difficult to escape. When swimming up behind the person, grab his biceps and force him on his back; the more he struggles the more he helps himself to keep afloat.
To prevent being clutched by a drowning person the following rules should be carefully studied. Every action, however, must be[p. 184] prompt and decisive, otherwise this method will be of no avail.
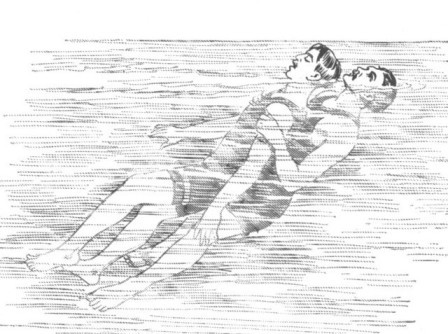
1. If grasped by the wrists, turn both arms simultaneously against the drowning person, thumbs outward, and attempt to bring your right arms at right angles to your own body. This will dislocate the thumbs of the drowning person and he must let go his hold.
2. If clutched around the neck, immediately take a deep breath, lean well over your opponent, place the left hand in the small part of[p. 185] his back and draw your right arm in an upward direction until in line with his shoulder, and pass it at once over his arm. Then with the thumb and forefinger catch his nose and pinch the nostrils close, at the same time place the palm of your hand on his chin and push firmly outward. This will cause him to open his mouth for breathing purposes, and he, being under you, will swallow water. Choking ensues, and not only is the rescuer let go, but the other is left so helpless as to be completely under control.
3. If clutched around the body and arms, take a deep breath, lean well over your opponent and throw the right arm in an upward direction at right angles to the body, or draw it up between your body and that of your opponent. Then with the thumb and forefinger catch the nose and pinch the nostrils close, and at the same time place the palm of the hand on the chin and bring the right knee as high as possible up between the two bodies, placing it, if possible, against the lower part of your opponent's chest; then, by means of a strong and somewhat sudden push, stretch your arms and legs out straight, at the same[p. 186] time throwing the whole weight of the body backward. The sudden motion will press the air out of the other's lungs, as well as push him off, no matter how tightly he may be holding.
Should the drowning person act sensibly and not try to grab his rescuer, he can be brought in by placing his hands on his rescuer's shoulders and kicking out his legs behind him while the rescuer swims in toward shore. Another method is to pull the person on his back by holding him under the right arm-pit with your right hand and using the left hand and legs to swim with. Should the rescue be close to shore, swim behind the person and help by pushing him in toward shallow water. Should the drowning person have sunk for the third time watch when the air-bubbles rise to the surface. At once dive down perpendicular to the bottom when the air-bubbles show, seize the drowning person and bring him to the surface by pushing off from the bottom and using your legs to send you upward to the surface. Before trying to rescue any one get rid of as much clothing as possible, if time will permit. [p. 187]
After bringing a drowning person ashore your work is only half done; the main thing is to bring him back to life should he be unconscious. There are several methods for resuscitating the apparently drowned. The method adopted by the Royal Humane Society of England is, to my knowledge, the simplest of all. It is as follows:
Begin treatment in the open air as soon as you have brought the unfortunate ashore. Meanwhile send for medical assistance, blankets and dry clothing. Expose the patient's throat and chest to the wind, except in very severe weather. Remove all tight clothing from neck and chest. Take off suspenders.
The points to be aimed at are: First and immediately the restoration of breathing, and, secondly, after breathing is restored, the promotion of warmth and circulation. The efforts to restore breathing must be commenced immediately and energetically, and persevered in for one or two hours, or until a medical man has pronounced that life is extinct.
Efforts to promote warmth and circulation[p. 188] beyond removing the wet clothes and drying the skin must not be made until the first appearance of natural breathing, for if circulation of the blood be induced before breathing has recommenced the restoration of life will be endangered. [p. 189]
To clear the throat, place the patient on the floor or the ground with the face downward and one of the arms under the forehead, in which position all fluids will more readily escape by the mouth, and the tongue itself will fall forward, leaving the entrance into the windpipe free. Assist this operation by wiping and cleansing the mouth.
If satisfactory breathing begins, use the treatment described below to promote warmth. If there be only slight breathing, or no breathing, or if the breathing fail, then, to excite breathing, turn the patient well and instantly on the side, supporting the head, and excite the nostrils with snuff, hartshorn, and smelling-salts, or tickle the throat with a feather, etc., if they are at hand. Rub the chest and face warm, and dash cold water, or cold and hot water alternately, on them.
If there be no success, lose not a moment, but instantly, to imitate breathing, replace the patient on the face, raising and supporting the chest well on a folded coat or other article of dress. Turn the patient very gently on the[p. 190] side and a little beyond, and then briskly on the face, back again; repeating these measures cautiously, efficiently and perseveringly about fifteen times in the minute, or once every four or five seconds, occasionally varying the side. (By placing the patient on the chest, the weight of the body forces the air out; when turned on the side this pressure is removed, and air enters the chest.)
On each occasion that the body is replaced on the face make uniform but efficient pressure, with brisk movement, on the back between and below the shoulder-blades or bones on each side, removing the pressure immediately before turning the body on the side. During the whole of the operations let one person attend solely to the movements of the head, and of the arm placed under it.
The result is respiration, or natural breathing, and, if not too late, life.
While the above operations are being proceeded with, dry the hands and feet, and as soon as dry clothing or blankets can be procured, strip the body and cover, or gradually reclothe it, but take care not to interfere with the efforts to restore breathing. [p. 191]
Rule 1. To Adjust the Patient's Position.—Place the patient on his back on a flat surface, inclined a little from the feet upward; raise and support the head and shoulders on a small, firm cushion or folded article of dress, placed under the shoulder-blades. Remove all tight clothing from about the neck and chest.
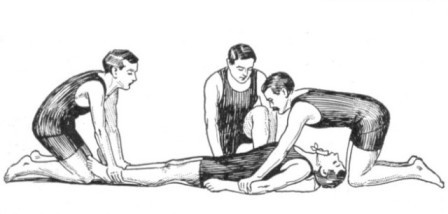
Rule 2. To Maintain a Free Entrance of Air Into the Windpipe.—Cleanse the mouth and nostrils; open the mouth; draw forward the patient's tongue, and keep it forward; an elastic band over the tongue and under the chin will answer this purpose. (Fig. 1.) [p. 192]
Rule 3. To Imitate the Movements of Breathing.—First, Induce inspiration. Place yourself at the head of the patient, grasp his arms (at the elbow-joints), raise them upward by the sides of his head, stretch them steadily but gently upward, for two seconds. By this means fresh air is drawn into the lungs by raising the ribs. (Fig. 2.)
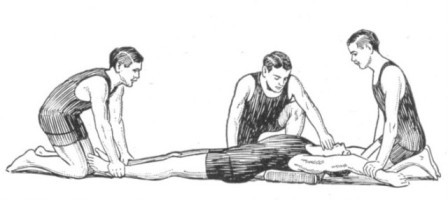
Secondly, Induce Expiration.—Immediately turn down the patient's arms, and press the elbows firmly but gently downward against the sides of the chest, for two seconds. By this means foul air is expelled from the lungs by depressing the ribs. (Fig. 3.)
Thirdly, Continue These Movements.—Repeat these measures alternately, deliberately, [p. 193] and perseveringly fifteen times a minute, until a spontaneous effort to respire be perceived. By these means an exchange of air is produced in the lungs similar to that effected by natural respiration.
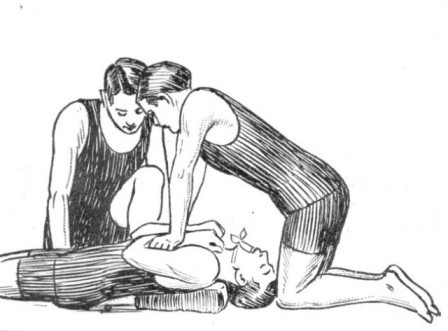
When a spontaneous effort to respire is perceived, cease to imitate the movements of breathing, and proceed to induce circulation and warmth, as described on following page.
Rule 4. To Excite Respiration.—During the employment of the above method, excite[p. 194] the nostrils with snuff or smelling-salts, or tickle the throat with a feather. Rub the chest and face briskly, and dash cold and hot water alternately on them. Friction of the limbs and body with dry flannel or cloths should be had recourse to. When there is proof of returning respiration, the individual may be placed in a warm bath, the movements of the arms above described being continued until respiration is fully restored. Raise the body in twenty seconds to a sitting position, dash cold water against the chest and face, and pass ammonia under the nose. Should a galvanic apparatus be at hand, apply the sponges to the region of the diaphragm and the heart.
To Induce Circulation and Warmth.—Wrap the patient in dry blankets, and rub the limbs upward energetically. Promote the warmth of the body with hot flannels, bottles or bladders of hot water; heated bricks to the pit of the stomach, the arm-pits, and to the soles of the feet.
On the restoration of life, when the power of swallowing has returned, a teaspoonful of warm water, small quantities of wine, warm[p. 195] brandy and water, or coffee should be given. The patient should be kept in bed, and a disposition to sleep encouraged. During reaction, large mustard-plasters to the chest and below the shoulders will greatly relieve the distrest breathing.
Note.—In all cases of prolonged immersion in cold water, when the breathing continues, a warm bath should be employed to restore the temperature.
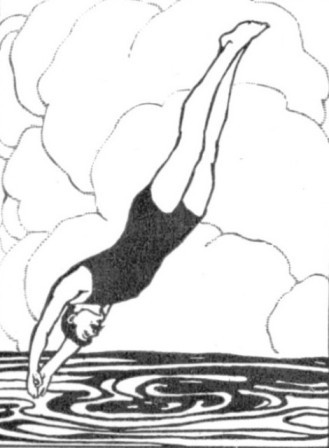
End of the Project Gutenberg EBook of Swimming Scientifically Taught, by
Frank Eugen Dalton and Louis C. Dalton

*** END OF THIS PROJECT GUTENBERG EBOOK SWIMMING SCIENTIFICALLY TAUGHT ***

***** This file should be named 19065-h.htm or 19065-h.zip *****
This and all associated files of various formats will be found in:
        http://www.gutenberg.org/1/9/0/6/19065/

Produced by Suzanne Lybarger, Brian Janes, Melissa Er-Raqabi
and the Online Distributed Proofreading Team at
http://www.pgdp.net


Updated editions will replace the previous one--the old editions
will be renamed.

Creating the works from public domain print editions means that no
one owns a United States copyright in these works, so the Foundation
(and you!) can copy and distribute it in the United States without
permission and without paying copyright royalties.  Special rules,
set forth in the General Terms of Use part of this license, apply to
copying and distributing Project Gutenberg-tm electronic works to
protect the PROJECT GUTENBERG-tm concept and trademark.  Project
Gutenberg is a registered trademark, and may not be used if you
charge for the eBooks, unless you receive specific permission.  If you
do not charge anything for copies of this eBook, complying with the
rules is very easy.  You may use this eBook for nearly any purpose
such as creation of derivative works, reports, performances and
research.  They may be modified and printed and given away--you may do
practically ANYTHING with public domain eBooks.  Redistribution is
subject to the trademark license, especially commercial
redistribution.


*** START: FULL LICENSE ***

THE FULL PROJECT GUTENBERG LICENSE
PLEASE READ THIS BEFORE YOU DISTRIBUTE OR USE THIS WORK

To protect the Project Gutenberg-tm mission of promoting the free
distribution of electronic works, by using or distributing this work
(or any other work associated in any way with the phrase "Project
Gutenberg"), you agree to comply with all the terms of the Full Project
Gutenberg-tm License (available with this file or online at
http://gutenberg.org/license).


Section 1.  General Terms of Use and Redistributing Project Gutenberg-tm
electronic works

1.A.  By reading or using any part of this Project Gutenberg-tm
electronic work, you indicate that you have read, understand, agree to
and accept all the terms of this license and intellectual property
(trademark/copyright) agreement.  If you do not agree to abide by all
the terms of this agreement, you must cease using and return or destroy
all copies of Project Gutenberg-tm electronic works in your possession.
If you paid a fee for obtaining a copy of or access to a Project
Gutenberg-tm electronic work and you do not agree to be bound by the
terms of this agreement, you may obtain a refund from the person or
entity to whom you paid the fee as set forth in paragraph 1.E.8.

1.B.  "Project Gutenberg" is a registered trademark.  It may only be
used on or associated in any way with an electronic work by people who
agree to be bound by the terms of this agreement.  There are a few
things that you can do with most Project Gutenberg-tm electronic works
even without complying with the full terms of this agreement.  See
paragraph 1.C below.  There are a lot of things you can do with Project
Gutenberg-tm electronic works if you follow the terms of this agreement
and help preserve free future access to Project Gutenberg-tm electronic
works.  See paragraph 1.E below.

1.C.  The Project Gutenberg Literary Archive Foundation ("the Foundation"
or PGLAF), owns a compilation copyright in the collection of Project
Gutenberg-tm electronic works.  Nearly all the individual works in the
collection are in the public domain in the United States.  If an
individual work is in the public domain in the United States and you are
located in the United States, we do not claim a right to prevent you from
copying, distributing, performing, displaying or creating derivative
works based on the work as long as all references to Project Gutenberg
are removed.  Of course, we hope that you will support the Project
Gutenberg-tm mission of promoting free access to electronic works by
freely sharing Project Gutenberg-tm works in compliance with the terms of
this agreement for keeping the Project Gutenberg-tm name associated with
the work.  You can easily comply with the terms of this agreement by
keeping this work in the same format with its attached full Project
Gutenberg-tm License when you share it without charge with others.

1.D.  The copyright laws of the place where you are located also govern
what you can do with this work.  Copyright laws in most countries are in
a constant state of change.  If you are outside the United States, check
the laws of your country in addition to the terms of this agreement
before downloading, copying, displaying, performing, distributing or
creating derivative works based on this work or any other Project
Gutenberg-tm work.  The Foundation makes no representations concerning
the copyright status of any work in any country outside the United
States.

1.E.  Unless you have removed all references to Project Gutenberg:

1.E.1.  The following sentence, with active links to, or other immediate
access to, the full Project Gutenberg-tm License must appear prominently
whenever any copy of a Project Gutenberg-tm work (any work on which the
phrase "Project Gutenberg" appears, or with which the phrase "Project
Gutenberg" is associated) is accessed, displayed, performed, viewed,
copied or distributed:

This eBook is for the use of anyone anywhere at no cost and with
almost no restrictions whatsoever.  You may copy it, give it away or
re-use it under the terms of the Project Gutenberg License included
with this eBook or online at www.gutenberg.org

1.E.2.  If an individual Project Gutenberg-tm electronic work is derived
from the public domain (does not contain a notice indicating that it is
posted with permission of the copyright holder), the work can be copied
and distributed to anyone in the United States without paying any fees
or charges.  If you are redistributing or providing access to a work
with the phrase "Project Gutenberg" associated with or appearing on the
work, you must comply either with the requirements of paragraphs 1.E.1
through 1.E.7 or obtain permission for the use of the work and the
Project Gutenberg-tm trademark as set forth in paragraphs 1.E.8 or
1.E.9.

1.E.3.  If an individual Project Gutenberg-tm electronic work is posted
with the permission of the copyright holder, your use and distribution
must comply with both paragraphs 1.E.1 through 1.E.7 and any additional
terms imposed by the copyright holder.  Additional terms will be linked
to the Project Gutenberg-tm License for all works posted with the
permission of the copyright holder found at the beginning of this work.

1.E.4.  Do not unlink or detach or remove the full Project Gutenberg-tm
License terms from this work, or any files containing a part of this
work or any other work associated with Project Gutenberg-tm.

1.E.5.  Do not copy, display, perform, distribute or redistribute this
electronic work, or any part of this electronic work, without
prominently displaying the sentence set forth in paragraph 1.E.1 with
active links or immediate access to the full terms of the Project
Gutenberg-tm License.

1.E.6.  You may convert to and distribute this work in any binary,
compressed, marked up, nonproprietary or proprietary form, including any
word processing or hypertext form.  However, if you provide access to or
distribute copies of a Project Gutenberg-tm work in a format other than
"Plain Vanilla ASCII" or other format used in the official version
posted on the official Project Gutenberg-tm web site (www.gutenberg.org),
you must, at no additional cost, fee or expense to the user, provide a
copy, a means of exporting a copy, or a means of obtaining a copy upon
request, of the work in its original "Plain Vanilla ASCII" or other
form.  Any alternate format must include the full Project Gutenberg-tm
License as specified in paragraph 1.E.1.

1.E.7.  Do not charge a fee for access to, viewing, displaying,
performing, copying or distributing any Project Gutenberg-tm works
unless you comply with paragraph 1.E.8 or 1.E.9.

1.E.8.  You may charge a reasonable fee for copies of or providing
access to or distributing Project Gutenberg-tm electronic works provided
that

- You pay a royalty fee of 20% of the gross profits you derive from
     the use of Project Gutenberg-tm works calculated using the method
     you already use to calculate your applicable taxes.  The fee is
     owed to the owner of the Project Gutenberg-tm trademark, but he
     has agreed to donate royalties under this paragraph to the
     Project Gutenberg Literary Archive Foundation.  Royalty payments
     must be paid within 60 days following each date on which you
     prepare (or are legally required to prepare) your periodic tax
     returns.  Royalty payments should be clearly marked as such and
     sent to the Project Gutenberg Literary Archive Foundation at the
     address specified in Section 4, "Information about donations to
     the Project Gutenberg Literary Archive Foundation."

- You provide a full refund of any money paid by a user who notifies
     you in writing (or by e-mail) within 30 days of receipt that s/he
     does not agree to the terms of the full Project Gutenberg-tm
     License.  You must require such a user to return or
     destroy all copies of the works possessed in a physical medium
     and discontinue all use of and all access to other copies of
     Project Gutenberg-tm works.

- You provide, in accordance with paragraph 1.F.3, a full refund of any
     money paid for a work or a replacement copy, if a defect in the
     electronic work is discovered and reported to you within 90 days
     of receipt of the work.

- You comply with all other terms of this agreement for free
     distribution of Project Gutenberg-tm works.

1.E.9.  If you wish to charge a fee or distribute a Project Gutenberg-tm
electronic work or group of works on different terms than are set
forth in this agreement, you must obtain permission in writing from
both the Project Gutenberg Literary Archive Foundation and Michael
Hart, the owner of the Project Gutenberg-tm trademark.  Contact the
Foundation as set forth in Section 3 below.

1.F.

1.F.1.  Project Gutenberg volunteers and employees expend considerable
effort to identify, do copyright research on, transcribe and proofread
public domain works in creating the Project Gutenberg-tm
collection.  Despite these efforts, Project Gutenberg-tm electronic
works, and the medium on which they may be stored, may contain
"Defects," such as, but not limited to, incomplete, inaccurate or
corrupt data, transcription errors, a copyright or other intellectual
property infringement, a defective or damaged disk or other medium, a
computer virus, or computer codes that damage or cannot be read by
your equipment.

1.F.2.  LIMITED WARRANTY, DISCLAIMER OF DAMAGES - Except for the "Right
of Replacement or Refund" described in paragraph 1.F.3, the Project
Gutenberg Literary Archive Foundation, the owner of the Project
Gutenberg-tm trademark, and any other party distributing a Project
Gutenberg-tm electronic work under this agreement, disclaim all
liability to you for damages, costs and expenses, including legal
fees.  YOU AGREE THAT YOU HAVE NO REMEDIES FOR NEGLIGENCE, STRICT
LIABILITY, BREACH OF WARRANTY OR BREACH OF CONTRACT EXCEPT THOSE
PROVIDED IN PARAGRAPH F3.  YOU AGREE THAT THE FOUNDATION, THE
TRADEMARK OWNER, AND ANY DISTRIBUTOR UNDER THIS AGREEMENT WILL NOT BE
LIABLE TO YOU FOR ACTUAL, DIRECT, INDIRECT, CONSEQUENTIAL, PUNITIVE OR
INCIDENTAL DAMAGES EVEN IF YOU GIVE NOTICE OF THE POSSIBILITY OF SUCH
DAMAGE.

1.F.3.  LIMITED RIGHT OF REPLACEMENT OR REFUND - If you discover a
defect in this electronic work within 90 days of receiving it, you can
receive a refund of the money (if any) you paid for it by sending a
written explanation to the person you received the work from.  If you
received the work on a physical medium, you must return the medium with
your written explanation.  The person or entity that provided you with
the defective work may elect to provide a replacement copy in lieu of a
refund.  If you received the work electronically, the person or entity
providing it to you may choose to give you a second opportunity to
receive the work electronically in lieu of a refund.  If the second copy
is also defective, you may demand a refund in writing without further
opportunities to fix the problem.

1.F.4.  Except for the limited right of replacement or refund set forth
in paragraph 1.F.3, this work is provided to you 'AS-IS' WITH NO OTHER
WARRANTIES OF ANY KIND, EXPRESS OR IMPLIED, INCLUDING BUT NOT LIMITED TO
WARRANTIES OF MERCHANTIBILITY OR FITNESS FOR ANY PURPOSE.

1.F.5.  Some states do not allow disclaimers of certain implied
warranties or the exclusion or limitation of certain types of damages.
If any disclaimer or limitation set forth in this agreement violates the
law of the state applicable to this agreement, the agreement shall be
interpreted to make the maximum disclaimer or limitation permitted by
the applicable state law.  The invalidity or unenforceability of any
provision of this agreement shall not void the remaining provisions.

1.F.6.  INDEMNITY - You agree to indemnify and hold the Foundation, the
trademark owner, any agent or employee of the Foundation, anyone
providing copies of Project Gutenberg-tm electronic works in accordance
with this agreement, and any volunteers associated with the production,
promotion and distribution of Project Gutenberg-tm electronic works,
harmless from all liability, costs and expenses, including legal fees,
that arise directly or indirectly from any of the following which you do
or cause to occur: (a) distribution of this or any Project Gutenberg-tm
work, (b) alteration, modification, or additions or deletions to any
Project Gutenberg-tm work, and (c) any Defect you cause.


Section  2.  Information about the Mission of Project Gutenberg-tm

Project Gutenberg-tm is synonymous with the free distribution of
electronic works in formats readable by the widest variety of computers
including obsolete, old, middle-aged and new computers.  It exists
because of the efforts of hundreds of volunteers and donations from
people in all walks of life.

Volunteers and financial support to provide volunteers with the
assistance they need, is critical to reaching Project Gutenberg-tm's
goals and ensuring that the Project Gutenberg-tm collection will
remain freely available for generations to come.  In 2001, the Project
Gutenberg Literary Archive Foundation was created to provide a secure
and permanent future for Project Gutenberg-tm and future generations.
To learn more about the Project Gutenberg Literary Archive Foundation
and how your efforts and donations can help, see Sections 3 and 4
and the Foundation web page at http://www.pglaf.org.


Section 3.  Information about the Project Gutenberg Literary Archive
Foundation

The Project Gutenberg Literary Archive Foundation is a non profit
501(c)(3) educational corporation organized under the laws of the
state of Mississippi and granted tax exempt status by the Internal
Revenue Service.  The Foundation's EIN or federal tax identification
number is 64-6221541.  Its 501(c)(3) letter is posted at
http://pglaf.org/fundraising.  Contributions to the Project Gutenberg
Literary Archive Foundation are tax deductible to the full extent
permitted by U.S. federal laws and your state's laws.

The Foundation's principal office is located at 4557 Melan Dr. S.
Fairbanks, AK, 99712., but its volunteers and employees are scattered
throughout numerous locations.  Its business office is located at
809 North 1500 West, Salt Lake City, UT 84116, (801) 596-1887, email
business@pglaf.org.  Email contact links and up to date contact
information can be found at the Foundation's web site and official
page at http://pglaf.org

For additional contact information:
     Dr. Gregory B. Newby
     Chief Executive and Director
     gbnewby@pglaf.org


Section 4.  Information about Donations to the Project Gutenberg
Literary Archive Foundation

Project Gutenberg-tm depends upon and cannot survive without wide
spread public support and donations to carry out its mission of
increasing the number of public domain and licensed works that can be
freely distributed in machine readable form accessible by the widest
array of equipment including outdated equipment.  Many small donations
($1 to $5,000) are particularly important to maintaining tax exempt
status with the IRS.

The Foundation is committed to complying with the laws regulating
charities and charitable donations in all 50 states of the United
States.  Compliance requirements are not uniform and it takes a
considerable effort, much paperwork and many fees to meet and keep up
with these requirements.  We do not solicit donations in locations
where we have not received written confirmation of compliance.  To
SEND DONATIONS or determine the status of compliance for any
particular state visit http://pglaf.org

While we cannot and do not solicit contributions from states where we
have not met the solicitation requirements, we know of no prohibition
against accepting unsolicited donations from donors in such states who
approach us with offers to donate.

International donations are gratefully accepted, but we cannot make
any statements concerning tax treatment of donations received from
outside the United States.  U.S. laws alone swamp our small staff.

Please check the Project Gutenberg Web pages for current donation
methods and addresses.  Donations are accepted in a number of other
ways including checks, online payments and credit card donations.
To donate, please visit: http://pglaf.org/donate


Section 5.  General Information About Project Gutenberg-tm electronic
works.

Professor Michael S. Hart is the originator of the Project Gutenberg-tm
concept of a library of electronic works that could be freely shared
with anyone.  For thirty years, he produced and distributed Project
Gutenberg-tm eBooks with only a loose network of volunteer support.


Project Gutenberg-tm eBooks are often created from several printed
editions, all of which are confirmed as Public Domain in the U.S.
unless a copyright notice is included.  Thus, we do not necessarily
keep eBooks in compliance with any particular paper edition.


Most people start at our Web site which has the main PG search facility:

     http://www.gutenberg.org

This Web site includes information about Project Gutenberg-tm,
including how to make donations to the Project Gutenberg Literary
Archive Foundation, how to help produce our new eBooks, and how to
subscribe to our email newsletter to hear about new eBooks.